Textures
Note that this page needs updated. It does not take into account the newer WW Material properties. Wall Worm Pro does not have the same limitations as Wall Worm; WW Pro can export arbitrary textures as demonstrated in the following video.
This page details how materials in 3ds Max map to materials in Source. Most of the material functions can be accessed in the Wall Worm > Wall Worm Materials sub-menu.
The rest of this page gives you various tips and facts relating to the 3ds Max materials, which materials you can use, what maps are exported and what settings can translate to the Source Material.
- Export Textures
-
Click this button to open a tool to export your textures to VTF. Note that it will only work on the following material types:
- Standard Material
- Multi/Sub-Object Material
- Shell Material
- Blend (See link for Blend to WorldVertexTransition docs)
In the case of these materials, almost all settings and parameters come ultimately from a Standard Material (as the multi-subobject, shell and blend all reference Standard Materials. The Blend is a special case and is detailed in the link above).
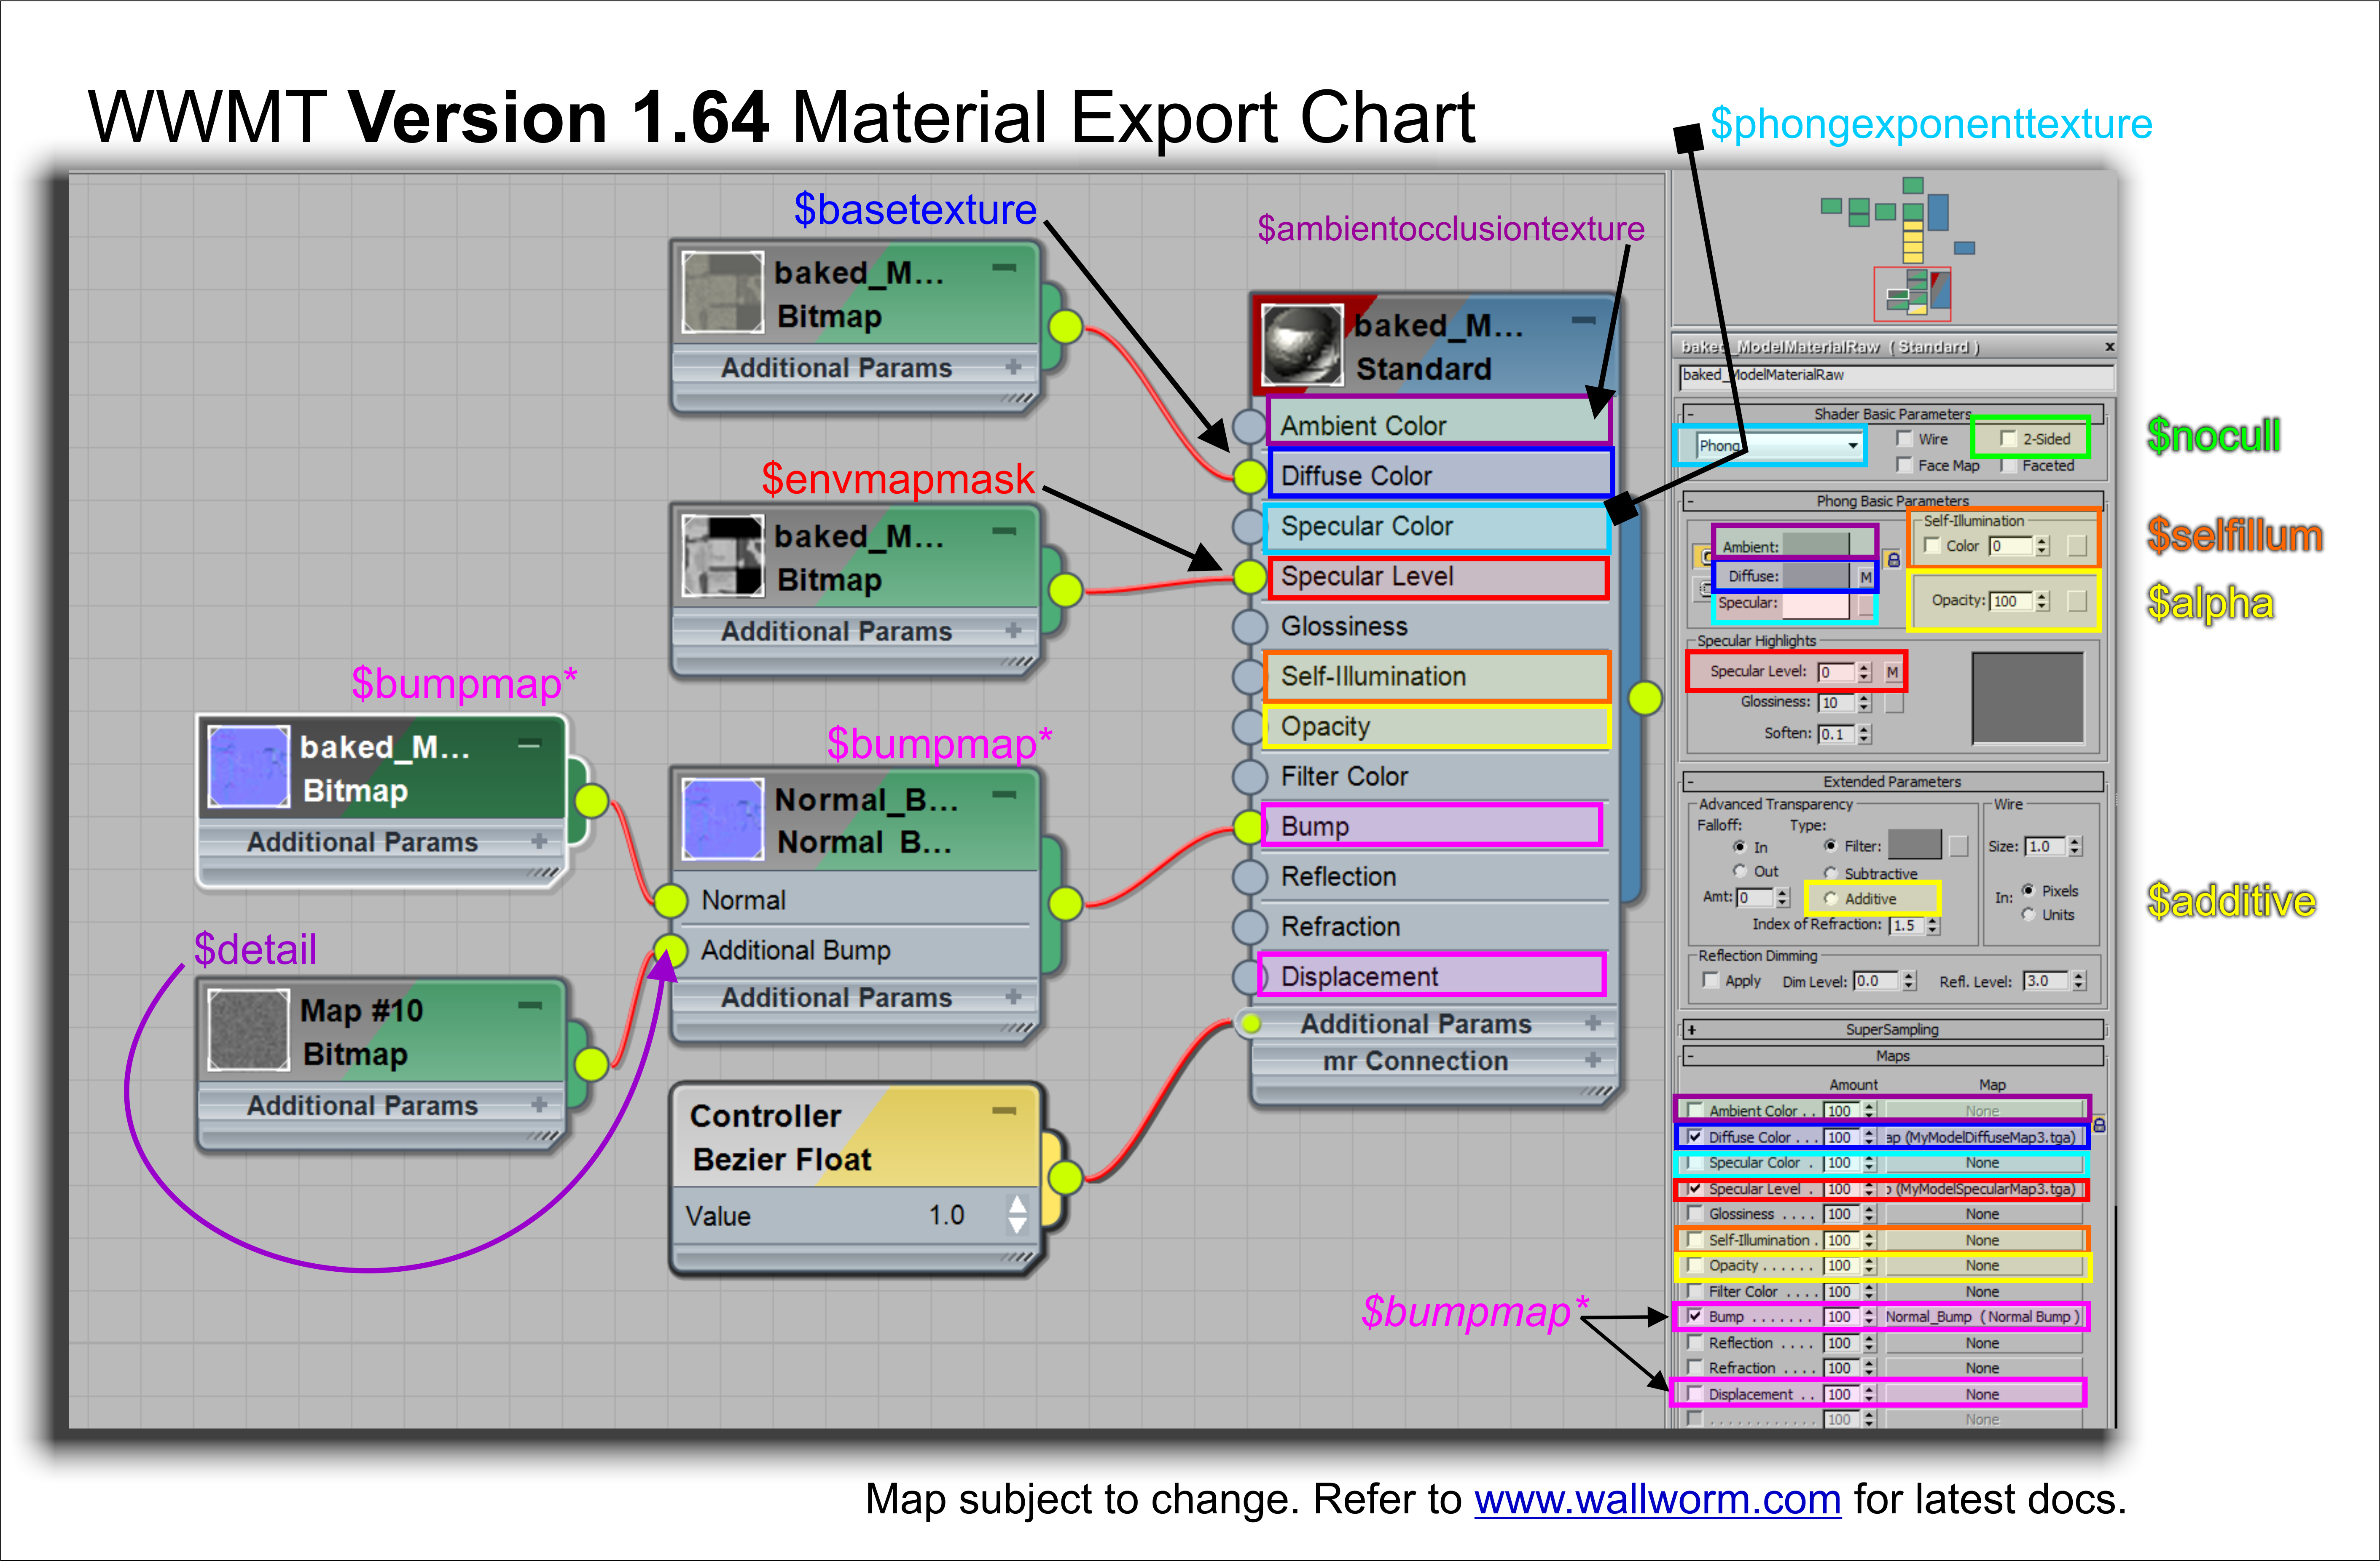
The tool will use the following maps (there is a chart further down the page):
- Diffuse becomes $baseTexture. If no bitmap present, uses the color as $color or $color2.
- Specular Level becomes $envmapmask
- Self Illumination becomes $selfillumtexture
- Bump/Displacement becomes $bumpmap
- Ambient becomes $AmbientOcclTexture (create this map with Mental Ray or Render Surface Map)
- When using the Phong shader, the Specular Color becomes the $phongexponenttexture
- The alpha channel of the diffuse map will export as transparency
- You must have the Bin Directory and Material Root Directory set for this function to work. Also, the model's Material Folder Path has to be set.
- The tool will only compile your textures automatically if you have Steam Running for some mods.
- Bitmaps will export to VTFs if they have valid dimensions. If you do not use dimensions where the height and width aren't powers of 2 (256x256, 512x512, 1024x1024, 512x1024, 2048x1024, etc) then the exporter will tell you that the bitmap has an Invalid Dimension.
- With the free Wall Worm, only TGA and PSD bitmap textures can export as VTF. With Wall Worm Pro, any arbitrary texture map can export as a VTF.
- *If you have a Specular map in your material as well as a Bumpmap or Displacement Map... then the Specular Level will only work under the following conditions: The Specular Map must be a TGA that has an Alpha channel that denotes the specularity AND that same bitmap is used in the Diffuse, Bump/Displacement or Self-Illumination map. See the Using Specular Level and Bump at the Same Time below.
- Support for the additional Map type Normal Bump was added as an alternative to using a Bitmap in the Bump slot of your material. This feature still requires you to use a TGA Bitmap in as the input for the Normal slot of the Normal Bump. (Also, you can now add a bitmap into the Additional Bump of the Normal Bump that will export as a $detail texture.)
For more info, read Exporting Textures.
Material Map and Glossary
Generally speaking, WWMT uses the 3ds Max Material Editor interface to control the exported textures. What this means is that you can mix your material settings inside 3ds Max and get a general idea of how it will look inside Source. This does not mean it will be a 100% accurate representation, but generally speaking I have tried to map settings and features from Source into their equivalent settings for Standard Materials.
The docs below refer to WWMT Version 1.64. If your materials do not export as expected, please make sure that you have the latest version of WWMT and have read all the release notes for your version of WWMT. Please also report any errors.
For the moment, use this chart. More detail and explanations will fill this page in the future. Note that some features will not export in combination with other features due to the way Source works. Others require specific setups (for example, having the correct alpha channel in certain bitmaps) to work properly. I will document those as I get time.
Also note, I have changed the $envmapmask from Specular Color to Specular Level since that this a more appropriate slot. This will affect any materials in your previous projects--and you should be prepared for that.
- Newer versions of WW also use the Reflection and Refraction maps. Reflection controls the env_map and refraction will control $refractamount and $refractinttexture.
- More maps and settings can be used if you add a WW Material to your materials.
Transparent Material
You can make your material transparent with a few settings. First, if you want it to be uniformly transparent, then set the Opacity spinner. Setting Opacity to 80 will make your material 80% opaque... setting it to 10 will make it almost entirely transparent.
If you want it to be transparent in a more complex way, you can use the alpha channel of the Diffuse bitmap. If Translucent Only if Diffuse in Opacity is off and you add an alpha channel to your diffuse bitmap, the model will be transparent based on that alpha channel. You can override that in the WWMT settings by turning on/off the Translucent Only if Diffuse in Opacity option. When you turn that setting on, you must use the same bitmap from in the diffuse and opacity map slots to transfer the diffuse texture's opacity.
- In version 1.65, a new WWMT setting for Force Opaque VMT if Model $opaque was added. If turned on (which it is by default) then exporting textures from a model with the $opaque flag will skip all settings related to transparency.
- When the exporter is exporting a transparent material, it will set the $translucent flag in the VMT unless there is a Self Illumination bitmap ($selfillum) or the Material is set to 2-Sided ($nocull)--in which case it becomes $alphatest.
- If your materials are always invisible in the model viewer, it may be that your bitmaps have an alpha channel making it invisible. You can re-render your bitmap with the correct alpha, remove the alpha channel in Photoshop/PHOTO-PAINT/Gimp or simply turn on the Translucent Only if Diffuse in Opacity setting which will then only export transparency if you use the same bitmap in diffuse and opacity.
- You can also tell your material to not use $alpha and/or $alphatest if you check the Opaque option in the diffuse bitmap node in the material editor.
Using Specular Level and Bump at the Same Time
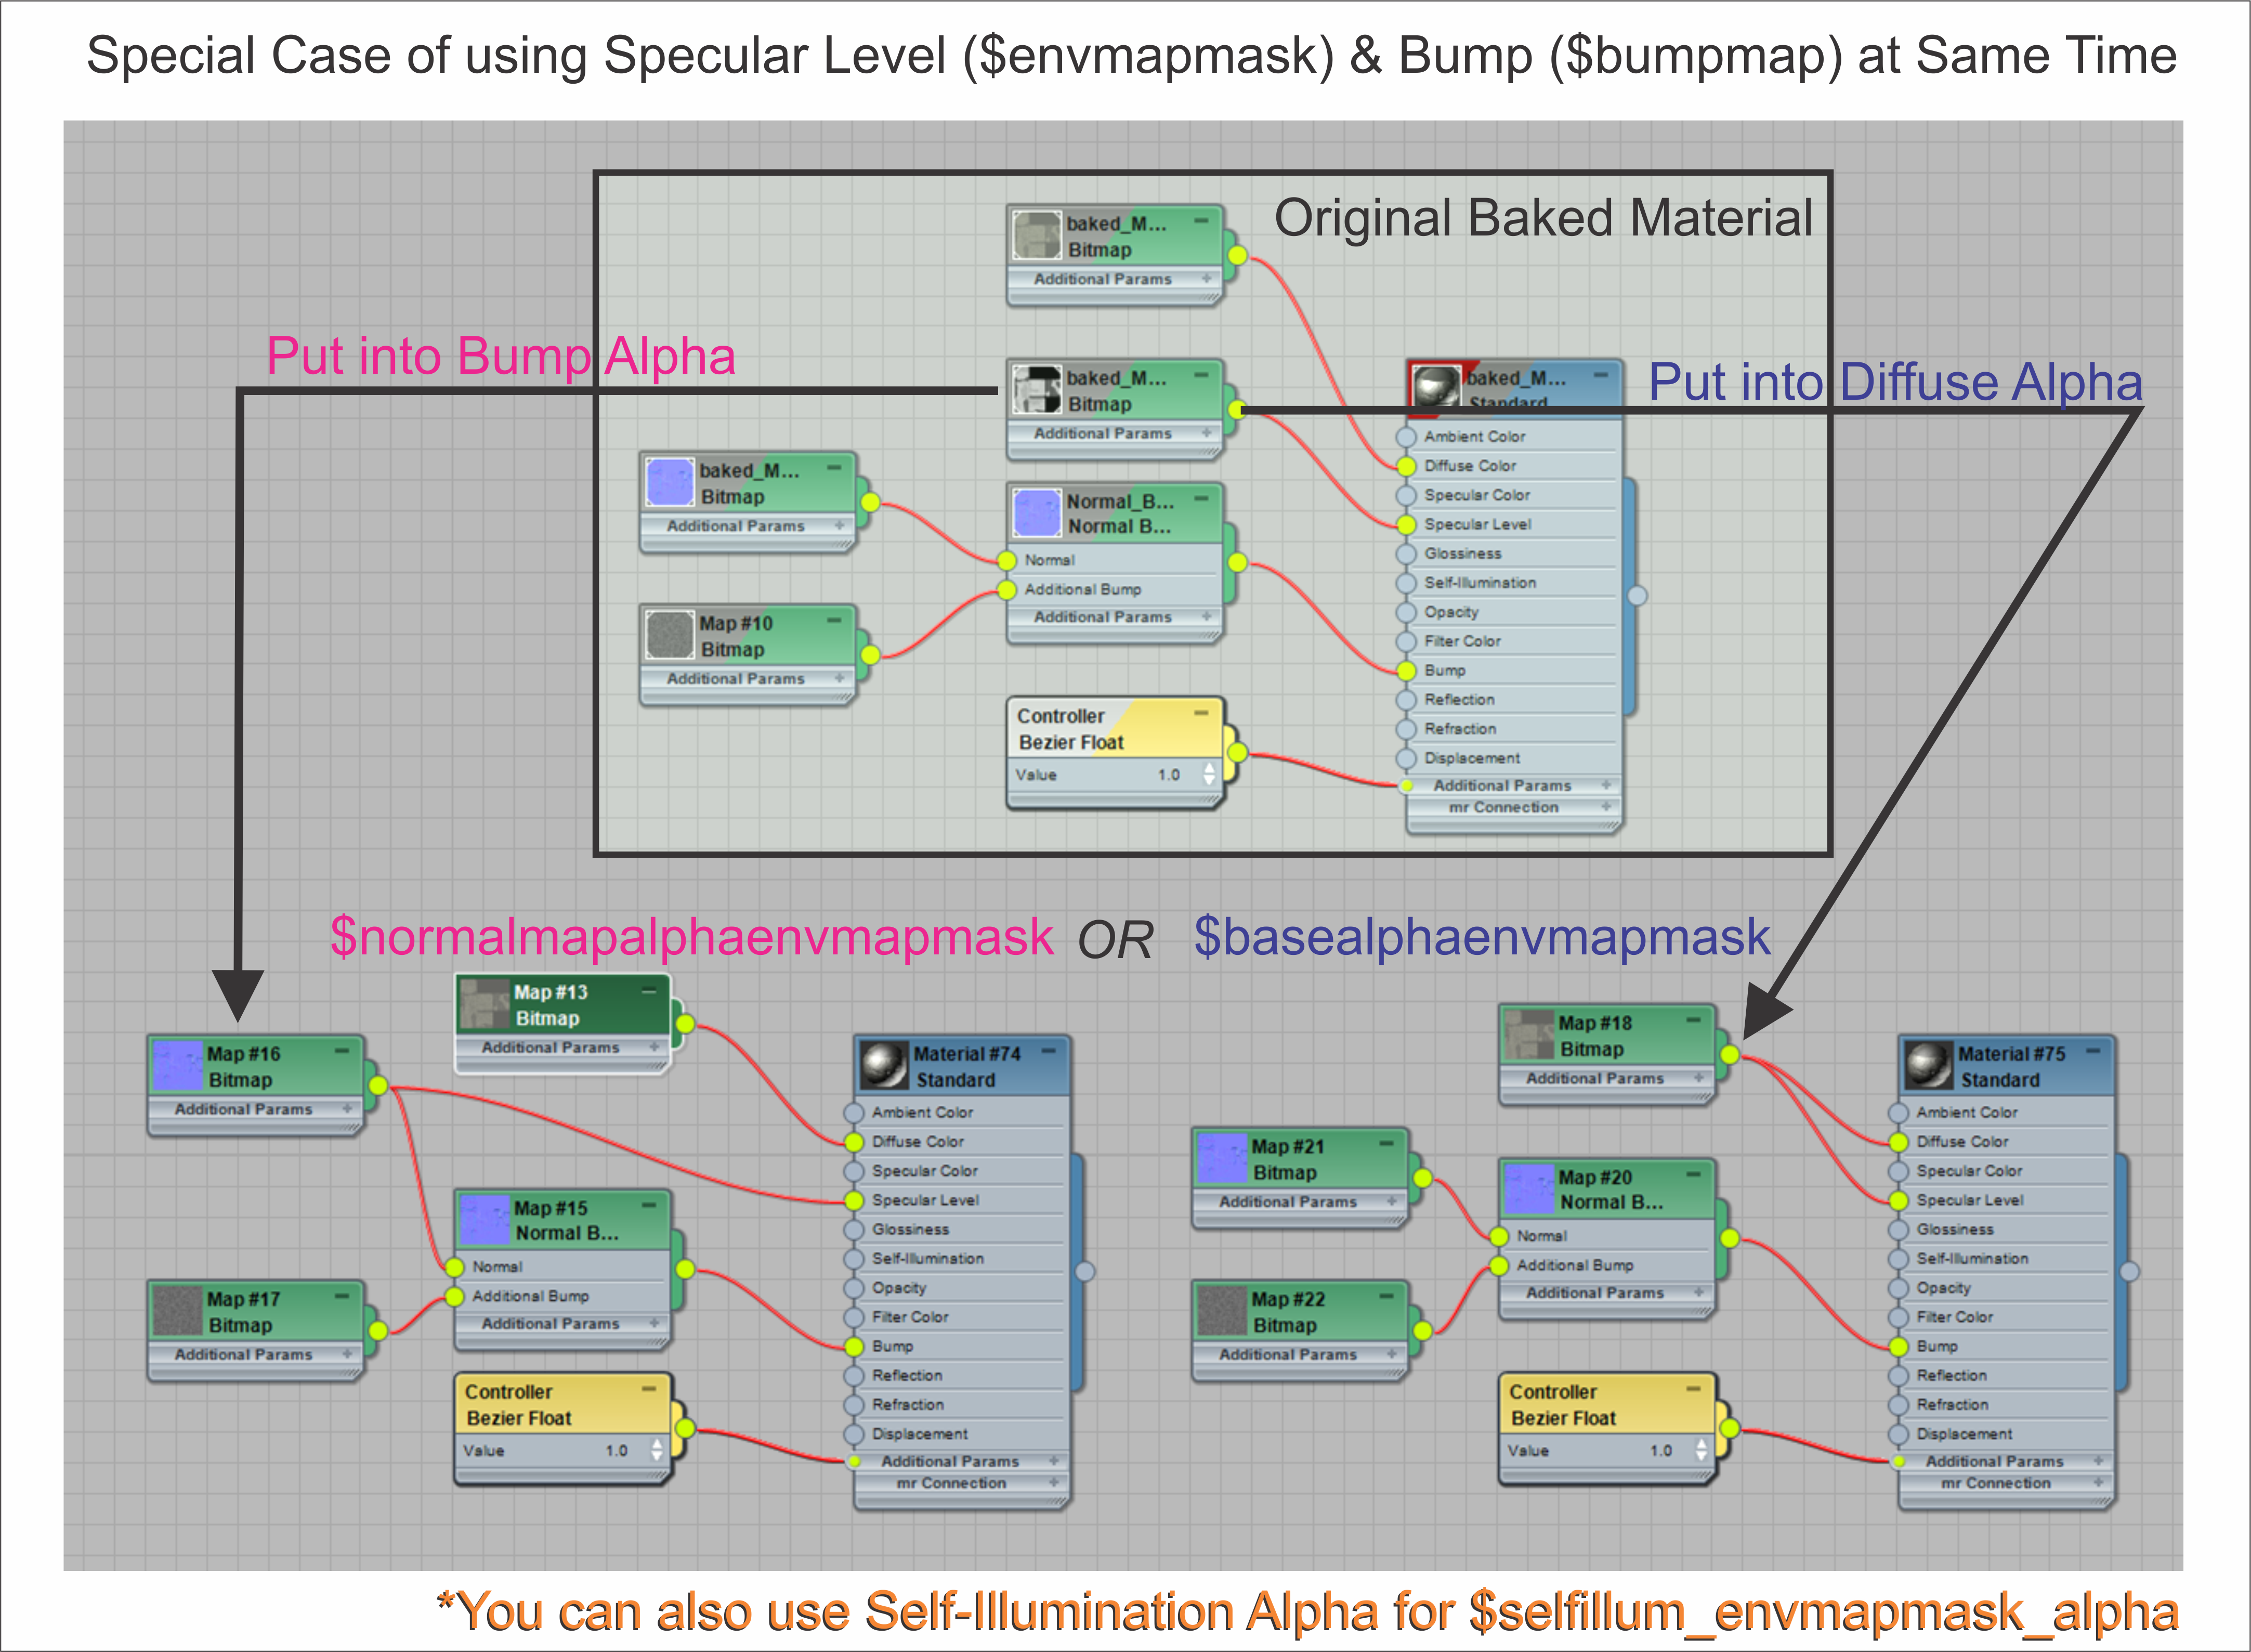
For some reason, the Source Game Engine does not let you assign a $bumpmap and an $envmapmask at the same time. When there is a $bumpmap texture assigned, the $envmapmask is ignored. You can still control the specular level, though, since Source lets you use the Alpha channel of the following textures for the Specular Mask: $basetexture (Diffuse), $bumpmap (Bump) or $selfillum (Self-Illumination).
WWMT will automatically do this for you if you assign the same bitmap in the Specular Level that you also have in one of those maps and that bitmap has an alpha channel. At the moment, you must manually transfer the specular level map into the alpha channel of one of those bitmaps via an image editor like Photoshop.
Below is an example of a raw material (top) and how you would use either the Bump or Diffuse alphas for storing the specular level information.
- It is possible that the Specular Level map may be in more than one slot at the same time (if you are using the diffuse in the self-illumination and specular level, for example). In that case, here is the order WWMT uses the alphas: 1) Bump, 2) Self-Illumination, 3) Diffuse. This could be important as some alphas may be used in inverted fashions depending on which map they come from--so make sure to read the VDC entry for $envmapmask for more details on why this is and more info on the format of your alpha.
- Version 1.67 of WWMT now includes an experimental tool to transfer Specular Level into Alphas of other maps. Please refer to Alpha Spec
Latest Articles
DX Display Shaders
Information on the DX shaders used by Wall Worm.
Using 4Way Blends

Overview of creating and working with Lightmapped_4WayBlend shaders in Wall Worm.
Animated Textures
Instructions on creating an animated texture in 3ds Max and exporting to Source.
Rotating Textures
Instructions on creating VMTs that animate the texture rotation.
Scrolling Textures
Steps for creating scrolling textures and exporting to Source.
Bitmaps to Materials
Information on creating substance-driven material libraries and generating tri-planar projection textures without need for UV mapping.
Exporting Animated Particle Textures

Instructions on exporting animated textures straight from 3ds Max into the Particle Editor.
Texturing World Geometry in 3ds Max
Basic tips on texturing world geometry in Max, especially for those with a Hammer background.
Advanced Texture Controls
With Wall Worm Pro, you can export arbitrary texture maps as VTF files in Source.
Importing WAD Files
Instructions on using the WAD importer in Wall Worm to bring WAD files from Goldsrc into 3ds Max.
- « Previous
- 1
- 2
- 3
- Next »


