Exporting Correct Smoothing on Models
Understanding Smoothing Groups and Explicit Normals
Most of the time when you create a model inside 3ds Max and export into Source, the smoothing matches exactly how it looks inside the 3ds Max viewport. However, there are situations where models will export with no smoothing between faces. This article will explain how and why this happens along with solutions.
The standard way to smooth faces in 3ds Max is to use Smoothing Groups. Smoothing groups are applied to Face/Polygons. Any two faces sharing an edge will smooth if they happen to share a smoothing group--whereas faces that have no shared smoothing groups or shared edges will not smooth.
Smoothing groups are not a native property to all geometry types and applications. In fact, most DCC (digital content creation) applications do not use smoothing groups. 3ds Max and Hammer both use smoothing groups, but applications like Blender, Maya, etc, do not. Moreover, most file formats do not store smoothing groups (including OBJ, SMD, DMX, MDL, etc). Instead, those formats store smoothing at the vertex per face level.
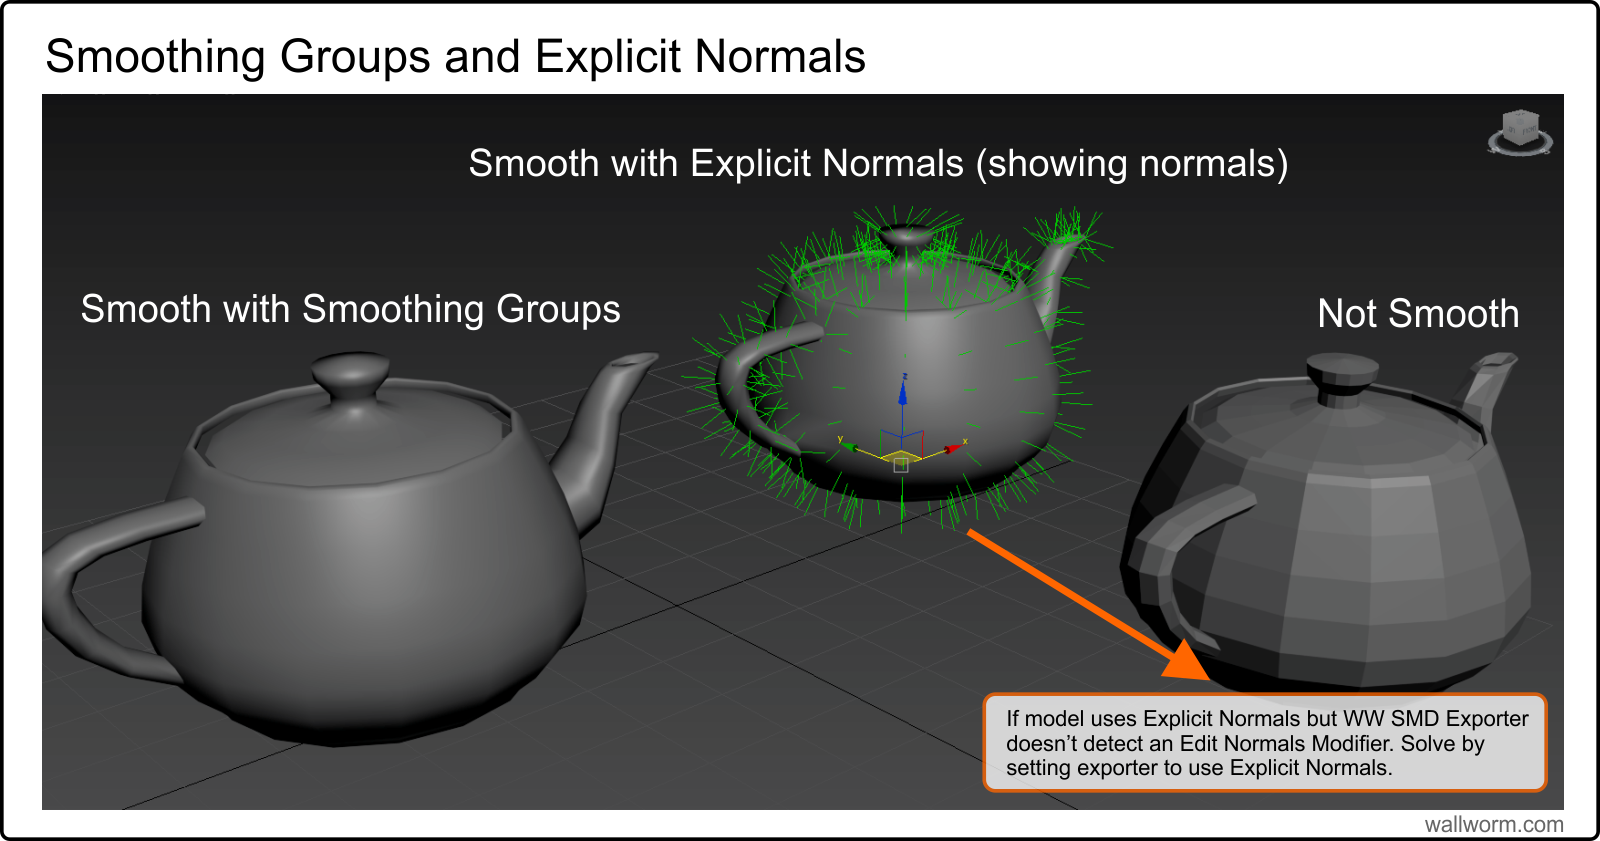
3ds Max allows you to use both smoothing groups and vertex per face normals (explicit normals). Wall Worm allows you to utilize either type of smoothing as well. However, Wall Worm does not always "know" which type you are using. In the image below, the far left teapot will always export into Source with correct smoothing. The center teapot is using explicit normals, and if Wall Worm isn't informed about the explicit normals, will export with no smoothing (as in the right teapot).
The SMD Exporter in Wall Worm has three modes:
- Automatic
- Face Render Normals
- Explicit Normals
The default mode is Automatic. The modes are explained below.
Automatic: If the mesh has an Edit Normals Modifier applied to it then Explicit Normals are used; if no Edit Normals modifier is on the mesh, face smoothing is used.
Face Render Normals: Normals are derived from the smoothing groups.
Explicit Normals: The explicit normals and smoothing groups are used.
Using Explicit Normals option will always produce correct results. However, this is not the default setting because the functions to read explicit normals are slow in MAXScript, which is what the free version of Wall Worm uses to read normals.
Setting the Normals Mode
There are two local controls for the normals mode in Wall Worm: The Wall Worm Model Tools (WWMT) Floater and the SMD Exporter. Both are drop-down menus labeled Normals. In the WWMT Floater, this is in the Model & Basic QC rollout above the Export QC+Model button. In the SMD Exporter, it's in the top-left section of the SMD Exporter UI.
Setting a Global Preference
You can choose a default normal mode in the global setting that will be applied to all new WWMT Helpers and the SMD Exporter.
- Click Wall Worm > Wall Worm Settings to open the global settings
- Open the Models tab
- Change the Normals setting in the Model Exporter Group at the top
- Click Save in right column
When you change the normal mode preference globally, it will not change currently existing WWMT Helpers.
Tips on when to set the global preference to Explicit Normals
- If you have Wall Worm Pro, always turn this option to Explicit Normals. Wall Worm Pro does not suffer from a slowdown when exporting explicit normals.
- If you primarily are importing assets from sources that do not use smoothing groups (from FBX, SMD, MDL, OBJ) you should set the default to Explicit Normals.
Known Issues
- Rotated Normals: If you are exporting a non $staticprop model that has Use Local Origin and the Rotated Origin option, your normals will be rotated 90 degrees. You should not use the Rotate option when not using $staticprop, and you should also consider not using the Use Local Origin when using non $staticprop compiles especially if the rootnode is not aligned to the World.
Resources on Smoothing and Normals
- Related Topics


