ProPal

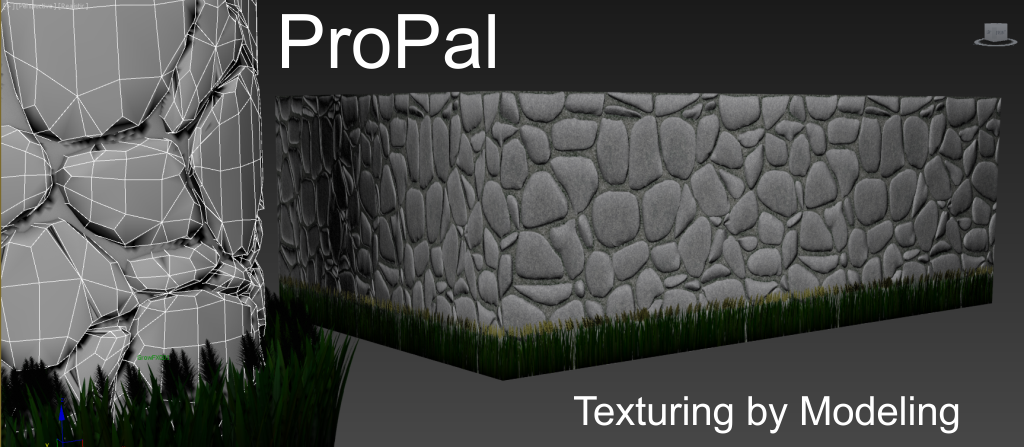
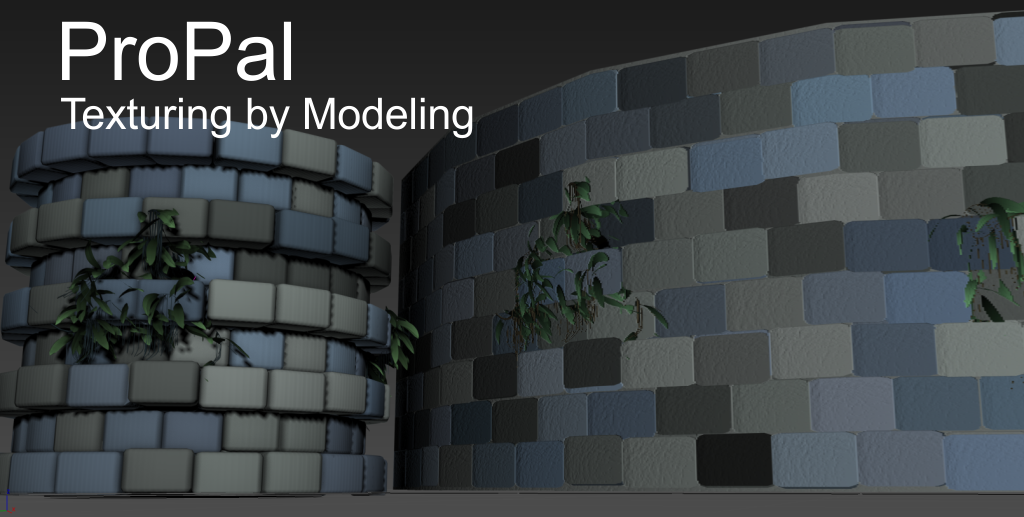
ProPal is a new plugin to speed up texturing projects. The primary purpose is to quickly convert modeled geometry into seamlessly tiling textures. It reduces the amount of clicks necessary when baking geometry to textures with Render to Texture (RTT). ProPal is a toolset for baking textures and geometry quickly and in a way that always tiles in either U or V. Now also part of ProPal is ProPalBoard, a toolset to quickly convert arbitrary views of the current scene into a single texture sheet with a few clicks; ProPalBoard was primarily designed to turn complex foliage models (or collections of such models) into optimizes billboards.
ProPal is composed of two new Geometry Classes called ProPal and ProPalBoard, and a Custom Attribute that is used with Projection modifiers. When set up, many of the attributes that you'd need to set up multiple times in the RTT UI are controlled by single parameters. For example, the bitmap dimensions are controlled by changing the dimensions simply in the ProPal UI and not per each render element in RTT. In all the examples in the above slideshow, the RTT Process was as simple as selecting the modeled geometry, running a function to create a ProPal object around the selection, then pressing the Render to Texture button in ProPal.
ProPal is not for every type of RTT Projection. It is for those that need to be projected onto a cylindrical target where the texture will tile seamlessly in U (like a building facade with moulding) or V (like a ladder). For creating sprite sheets, use ProPalBoard instead (lower in page).
Using ProPal
The basic usage of ProPal works like this:
- Select the geometry that you want to project onto the texture.
- Click the Create ProPal Around Selection Button.
- Check the desired render elements such as Diffuse, Normal, etc.
- Set your desired texture output path. By default this will be #scenassets/images/propal
- Click the Render to Texture button.
Tips
- For better normal maps, you may need to reduce the radius of the ProPal object to within your model(s) and then use the Projection modifier's push function to extend the projection cage beyond the radius of the model's extent.
- For better normal maps, you may need to increase the Sides parameter of the ProPal object.
ProPal User Interface
ProPal is composed of two aspects. The ProPal geometry class is a cylindrical object that stores all the parameters. There is also a ProPal Connection custom attribute that is applied to Projection Modifiers that will manipulate the base ProPal object from the Projection modifier so you do not need to go down the modifier stack to make changes to the ProPal object. Most parameters and buttons are in both the ProPal object and the custom attribute, but those that are not are indicated with a note.
Geometry
These parameters control the geometry of the ProPal object.
- Axis
-
This is the local axis used for setting the direction of the height. By default this is set to the Z axis.
- Height
-
This is the height of the ProPal geometry from it's pivot. The height will extend into the direction of the axis used.
The > button next to height will set the height such that it will match the current circumference of the ProPal object based on the radius setting.
- Radius
-
This parameter controls the radius of the ProPal object.
The > button next to the radius will set the radius such that the resulting circumference of the ProPal object will match the current height.
- Radius Multipliers (X/Y)
-
The radius multipliers will force the x/y radius to expand/contract in the respective radius. The values default to 1 and create a circular shape. When not equal, the shape will become oval.
- Segments
-
Set the number of hieght segments in the ProPal object.
- Sides
-
Set the number of sides in the ProPal object.
Projection
These settings control the InodeBakeProjProperties properties of the ProPal node. They are identical to those in the Projection floater inside the RTT Menu. To access all of the parameters, you need to use the standard RTT dialog.
- Get Settings From Node
-
When pressed, the settings are collected from the node's InodeBakeProjProperties. This might be necessary if you opened the RTT Projection UI and changed a setting.
- Hit Detection
-
See the Max documentation on this setting.
- Crop Alpha
-
See the Max documentation on this setting.
- Add Projection Modifier
-
Add a projection modifier to this ProPal and apply the ProPal Connection custom attribute to it.
Textures
- Ratio
-
When the Lock option is on, this controls the ratio of the Width to Height in the resulting bitmaps.
- Lock
-
When on, locks the height of the bitmaps to a value determined by the Width divided by the Ratio.
- Width
-
The width of the bitmaps rendered.
- Height
-
The height of the rendered bitmap.
- Render Elements
-
These are the elements that you can render out. Note that some have extra checkboxes that relate to their special settings such as shadows, etc.
While all elements will get rendered to file, not all will end up in the automatically generated material because there may not be a specific map slot for that element such as the Blend element.
- Output Path
-
Set the foler where the files will render to. By default this is #sceneassets/images/propal .
The name of the bitmaps matches this pattern: Output Path + ProPal Node Name + RenderElement + File Type.
- File Type
-
Set the file type. Current types are:
- TGA (default)
- EXR
- HDR
- BMP
- DDS
- PNG
- JPG
- TIF
- Render to Texture
-
Press this button to start rendering to texture immediately. Note that this will not bring up the RTT dialog. If you need to tweak the RTT settings, open the RTT dialog as usual in Max (Press 0 on the keyboard).
ProPal Connection Utilities
Some of the settings in the ProPal Connection custom attribute do not exist in the ProPal UI:
- Match Height
-
This button will move the ProPal node to the lowest point to align to the lowest point of the objects in the Projection modifier's node list. The lowest point is determined by the axis used in the ProPal object. The height will then extend to the highest point in that axis determined by the extent of the projection nodes.
- Match All
-
Match All is identical to Match Height except that it also tries to match the radius to encompass the nodes.
ProPalBoard
ProPalBoard is a geometry class for creating multiple projections of arbitrary objects directly into a sprite sheet or texture atlas. This geometry class is included with ProPal.
Create ProPalBoard for Selection
This macroscript will create a propalboard node using the selected objects. Each object will be added to the ProPalBoard's Projection Reference Geometry. If there are helpers in the selection, those helpers will become the source points for the ProPalBoard; if there are no helpers, each of the geometry will be used instead.
Installation
To install ProPal and ProPalBoard, first download it with the Buy ProPal links. Then:
- Copy the plugins/propal.mse from the download to your #maxroot/scripts/startup folder.
- Copy the macroscripts/ProPalMacros.mcr to your #maxroot/MacroScripts folder. (Not required if you have the latest Wall Worm Model Tools or Wall Worm Pro installed as this function is added during the installation of those tools).
- Restart 3ds Max
To use the Create ProPal Around Selection function, you must add it to your menus or buttons with the Customize > Customize User Interface menu and look in the wallworm.com category.
Known Issues
- Using a texture ratio other than 1.0 (or manually setting a height different to width) does not currently render the entire surface of the projection. It is recommended to use identical texture dimensions.
- Changes made to the InodeBakeProjProperties and InodeBakeProperties do not automatically propagate to the ProPal object if changed in RTT. ProPal will override those settings unless you click the Get Settings from Node buttons in ProPal before any settings are changed in the ProPal UI.
- The Match All function in the ProPal Connection custom attribute does not always produce a radius that matches the projection target nodes. You may have to manually set the radius to your needs.


