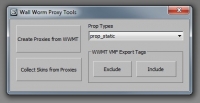
WWMT Proxy Tools
Note: The traditional Proxy system in WW is now defunct. In WW 3+ you can use the native Source Model objects in Max in the Create > Geometry [category: Wall Worm] > Source Model. This geometry class (WallWormMDL) will allow using a MDL file, WWMT Helper or QC file as the source of a prop in the scene. This is now the geometry class WW creates when making a WWMT Proxy. As such, much of the information below is unnecessary.
One important note about this change in WWMT Proxies composed of the WallWormMDL class is that those proxies cannot be used for skinning. So to make custom skins to export, please see the information about skinning proxies.
 The WWMT Proxy functions allow you to re-use models in a scene that you are exporting as a VMF. What this means is you can build a single model but create copies (proxies) that designate a position to place the model again in the VMF. Proxies also make a convenient way of creating multiple skins for your model--because you can apply multiple materials to different proxies... then assign all those materials as skins of the original model.
You can access the Proxy Tools UI by clicking Wall Worm > Wall Worm Utilities > WWMT Proxy Tools in the 3ds Max menu.
Proxy Functions
- Create Proxies from WWMT
- This function will create a proxy mesh for each selected WWMT helper in the scene. The new proxies are automatically selected.
- Collect Skins from Proxies
- This function will collect all the materials applied to the proxies of the selected WWMT helpers and assign the materials to the parent WWMT helper. After this, the exported process for that model will include the skins.
- Prop Types
- Select any Proxy or WWMT helper and then select a prop type from the list to make those models export as that prop type. Note that when you apply this function to a WWMT helper, it propagates to all that helper's proxies.
- WWMT VMF Export Tags
- This group of functions will tag the selected WWMT helpers to be included/excluded from the VMF exporter. All WWMT models are included in the VMF Export by default... but you can use the exclude button on a selected WWMT helper to exclude it from exporting--in which case only the proxies get exported. You can press the include button to include models that were excluded inappropriately.
More about WWMT Proxies
Note: This section may not be valid for WWMT 1.79+.
The exclude function for WWMT models was added to deal with a problem that can occur for animated models designed away from the world origin. Some models need to be exported with their pivot point at the world position [0,0,0] because the $origin command (which is used when you check the Use Local Origina as World Origin option for a WWMT model) only works with some kinds of models.
Common attributes that fail to export correctly with models not at the world origin:
- Attachments
- Bones
To alleviate this, you can take the following steps:
- Finish designing your model at it's target location. (That the model is done is important.)
- Create a proxy for that model.
- Align the proxy to the location of the original model.
- Select and move the original model (and all of its components like collision hulls, bones, LODs, etc) such that the model's root mesh is located at position [0,0,0]
- Select the model's WWMT helper.
- Using the WWMT Proxy Tools function, click the exclude button.
- Uncheck the Use Local Origin as World Origin for this model.
- Export the model.
- Move this model and its components to a new layer and hide that layer.
- Now, when you export this scene as a VMF, only the proxy will be inserted into the VMF code.


