Carver
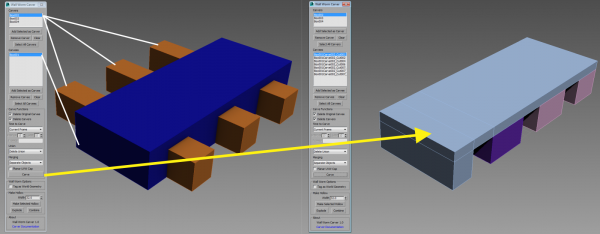
Carver is an enhanced carving tool similar to the Carve tool in Hammer--but far more advanced. This tool allows you to use one or more cutter objects to carve into one or more other objects. Unlike the Boolean functions in Max (ProBoolean) this will create multiple independent blocks or sealed elements. If the original block is convex, all pieces will be convex as well.
There are several functions in Carver: Carve and Make Hollow that replicate some functions found in Hammer. The included Bounding Cull Modifier (for Max 2016+ only) allows you to slice off geometry by the bounding box of another object in the scene. There are also some other utility functions such as Fix Coplanar (removing edges between adjacent/coplanar faces to merge them into a single polygon); Remove Isolated Edge Verts to remove vertices used by less than three edges (for convex objects with no borders or open edges); Select Planar Objects; Explode and Combine. Finally, there are functions for optimizng boolean actions that add extra culling functionality to Wall Worm's Convert Scene to Model utility.
Carve
For the carve function, you must add both Carve and Carvee objects. The Carve objects will cut into the Carvee objects. You have options for keeping or deleting the union sections, as well as grouping or collapsing the resulting blocks and unions.
The general workflow for carving is:
- select the object you want to carve with and add them to the Carvers list with the Add Selected as Carver button.
- Add the objects that should be carved into the Carvees list by selecting them and pressing the Add Selected as Carvee button.
- Make any changes to the settings (which are described below) for your desired results.
- Press the Carve button.
Options
- Delete Original Carvee
-
When on (default = on) then all objects in the Carvee list are deleted at the end of the Carve process. When left off, the original carvee objects remain in the scene and overlap with the carved pieces.
- Delete Carvers
-
When on (default = off) then all objects in the Carver list are deleted at the end of the Carve process.
- Time to Carve
-
This menu determines the point in time to make a carve. For carver/carvee sets that are not animated, this setting does nothing. However, for animated sets, it will determine the time of carve.
- Current Frame (default): Carves at the current frame.
- Interval From Now: make a carve at the current frame and every Nth frame determined by the Interval spinner. The number of carves is limited by the Limit spinner.
- Specified Frames: Enter a comma-separated list of frames to carve in the Frames text area.
- Union
-
This menu determines what to do with union blocks (those blocks resulting from the space shared by both carvers and carvees.
- Keep All (default): The union space is left intact. This is useful for leaving the carved space so that you can tie the volume to a brush entity.
- Delete Union: Deletes the volume. Good for carving out empty spaces and mimics the results used in Hammer's Carve tool.
- Select Union: Identical to Keep All except that the union blocks are selected at the end of the carve.
- Merging
-
This menu determines what to do with the blocks at the end.
- Separate Objects (default): Each resulting block will remain an independent object.
- Group All: the results are kept separate as object nodes but are placed into a Group node.
- Group Union Separate: Identical to Group All except that if the Union objects were not deleted, the Union objects are placed into a separate group (meaning there will be two groups resulting from the action).
- Collapse to Single Mesh: All objects resulting from the carve are put into a single mesh node.
- Collapse Union Separate: Identical to Collapse to Single Mesh except that the Union nodes (if not deleted) are collapsed into their own separate node.
- Planar UVW Cap
-
When on (default = off) then all polygons resulting from a carve will get a UVW modifier applied to them to make the polygon planar. This fixes skewed UVs on such faces because the default Cap() function in MAXScript does not apply planar mapping to the polygon. Unfortunately, the UV will still not flow with the UV transform and this option slows down the carve.
- Delete Outside Nodes
-
When on (default = off) then all resulting blocks that do not touch the original carver space will be delete from the results. This option is especially useful with the Make Hollow function (below).
Hints
The order of the Carvers will affect the cuts. All cuts are made in the order of the carvers. Understanding this can help you understand the way cuts are made and can help you control the nature of the carves.
Make Hollow
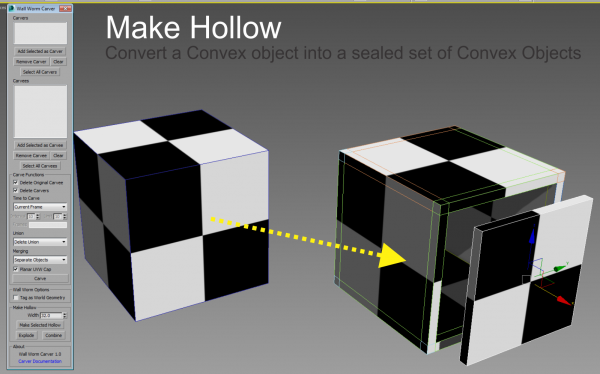
The Make Hollow function allows you to turn convex objects into hollow objects (similiar to using the Shell Modifier). The results will be a collection of convex blocks usable in a game engine.
To Make Hollow:
- Set desired Carve Settings (explained above). To make a Hollow Cube as you would in Hammer's Make Hollow, turn on these settings: Delete Original Carvee, Delete Carvers, Delete Outside Nodes and set Union to Delete Union. (To keep the volume of the hollow space for en entity, then do not use Delete Union).
- Set the desired width of your block walls with the Width Spinner.
- Select the object(s) in the scene that you want to make hollow.
- Press the Make Selected Hollow button.
Carver Utilities
The Carver Utilities include several functions that are useful for dealing with objects that need to be utilised for BSP level design.
- Explode
-
Press this button to detach each element of each selected object into a new separate object. The original node is deleted. Each new node has a pivot point at its center.
- Combine
-
Combine is the opposite of explode. Each object in the selection is attached as an element of the resulting object. The center of the original objects becomes the new pivot point.
- Select Planar Object
-
This function will filter the current selection (or all objects if none are currently selected) to those that are planar. Good for finding this kind of invalid world geometry.
- Fix Coplanar
-
This function will remove edges between coplanar polygons in all editable poly objects in the current selection. Adjacent, coplanar faces are merged into a single Polygon. Useful for converting triangulated meshes objects into clean world geometry.
- Remove Isolated Edge Verts
-
This function will remove all vertices from the selected editable poly objects where the vertex has less than three edges. This function presumes your object(s) have no non-planar polygons. (If your geometry is composed of non-planar polygons, you can fix them with the Break Non Planar Faces on Selection function found in Anvil's Brush Functions Rollout in the Miscellaneous tab. Anvil is not part of Carver, but is part of the free Wall Worm tools.) You should only use this function on sealed objects (no borders).
Bounding Cull Modifier
This scripted modifier is available in 3ds Max 2016+. It will allow you to clip off a mesh node by the bounding box extents of other objects in the scene. It allows you to set which extent to use (Top, Bottom, Left, Right, Front or Back) and desginate a padding. This is useful when you want to control clipping based on other objects in the scene.
Installation
To install Carver, copy the carving_tools.mse to your 3ds Max scripts/startup folder. Then click MAXScript > Run Script... and browse for the file. Then copy the LaunchCarver.mcr to your macroscripts folder (if you do not use Wall Worm). There will now be a category in your Customize menus called "wallworm.com". You can then add a menu or button with the Wall Worm Carver function.
(Also, in the latest versions of Wall Worm, you'll find a menu to launch this tool under Wall Worm > Wall Worm Level Design > Wall Worm Carver. If you have Wall Worm installed, it is not necessary to copy the LaunchCarver.mcr file to your macroscripts folder.)
Known Issues
- When using multiple Carvers simultaneously, resulting blocks may have unexpected results. Using single carvers is recommended.
- When using Interval or a comma separated list of frames with Time To Carve, you may have unexpected results. Using Current Frame is recommended.
- Sides of objects derived from carves may have non-planar UVW mapping unless Planar UVW Cap is turned on.
- Using Planar UVW Cap increases carve times.
- The Planar UVW Cap function does not currently flow from any UVs of adjacent sides. Instead, Planar UVW Cap is always aligned to the polygon center at this moment.
- The Remove Isolated Edge Verts will not remove vertices that are on borders.
