Normal Tools
Normal Tools Overview
 The Normal Tools give you several ways to set the Normals on objects in your scene. Methods include using a Helper object for aligning Normals, using a helper as a target for Normal vectors, tools for typing in specific Normal values, and functions to point normals out from common points like pivots and centers. There are also some helpful Normal selection tools to help speed up your work flow.
Normal Tools is now bundled with Wall Worm.
When you install the Normal Tools you'll see a whole new rollout of functions when you add an Edit Normals modifier to an object. Those are added via a special custom attribute. The new rollout has functions that add extra functionality for selecting/setting normals. Working with foliage models for games is a lot easier with these functions.
Almost all functions include Macroscripts that can be utilized in custom scripts. The more that you understand Normals and the Edit Normals Modifier, the more you will appreciate the utilities in Normal Tools.
Inside the Normal Tools rollout (shown above right) you will notice a radio button labeled Apply To. This setting controls both the selection functions (at top) and the setting functions (below). Switch this setting when wanting to work on just the current selection or to the whole object. Most of the functions such as Out From/Element Out From have the same functions as explained in the Normal Tools Floater below.
 Floater User Interface
Not only is there an extra rollout in new Edit Normals modifiers, there is also a floater for working on multiple objects at once and some extra functions that aren't directly inside the Edit Normals custom attribute rollout. The Normal Tools UI is broken up into the following sections:
- Helper Tape
- Target
- Normal Values
- Set Normal Selection
- Apply To
- Auto Align from Object
- Auto Align via Elements
- Randomize
The use of these different sections are detailed in the following documentation.
Helper Tape
The Helper Tape is a standard Tape Helper that you can use for setting Normal directions.
- Get Helper
-
Press this button to select the current Tape Helper in the scene. (If none exists for this session, a new Helper Tape will be created in the scene and selected. By default, this Tape will be positioned at the current selection center with a target pointing up in the Z axis (a normal vector of [0,0,1]).) This Tape will be used as the default Helper Tape until deleted or the Normal Tools floater is closed or re-opened.
- Get Existing
-
Press this button to reuse an existing Tape Helper in the scene and set it as the current Helper Tape.
- Move Helper to Picked Point
-
Press this button to bring up a Pick Point cursor. When you click a point in the scene, the Helper Tape will move to that location (but the target for the existing tape will remain at its current location). This function is useful for changing the normal direction without changing the current scene selection.
Target
This set of functions works with the Helper Tape's Target.
- Get
- Press this button to select the Target for the normals. If no Helper Tape exists yet, a new one is created in the scene and its helper is selected.
- Set Normal From
-
When pressed, the Normal Value (below) is updated to match the current direction of the Helper Tape based on the vector between the Helper Tape and the Target.
- Move Target to Picked Point
-
When pressed, you can pick a point in the scene. Once picked, the Helper Tape Target will immediately move to that location. This function is useful for changing the normal direction without changing the current scene selection.
Normal Values
This set of functions allows you to set specific normal values as well as ways to derive normal values from other objects in the scene.
- Up/Down Buttons
-
These two buttons set the current normal value to [0,0,1] (Up) or [0,0,-1] (Down). The Helper Tape Target will immediately match this normal vector.
- Normal
-
This value is the current normal vector for edited normals when the Point Normals to Target is off. Valid formats for this value are:
- [0,0,1]
- [0 0 1]
- 0 0 1
- 0,0,1
To force the Helper Tape Target to match this vector, click the Set Helper Angle to Normal button (below).
- Move Tape To Surface (default: On)
-
This option relates to the Get Normal From Surface function (below).
- Get Normal From Surface
-
When pressed, you can pick a surface in the scene to derive the Normal from the picked surface. Once picked, the current Normal value (above) will be set to the surface normal picked. If Move Tape To Surface (above) is also on, then the Helper Tape is positioned at the picked point and the Target will match the surface normal.
Set Normal Selection
This section gives you some tools for selecting Normals.
 Wall Worm's Normal Tools are a collection of utilities to make it easier to work with Normals inside 3ds Max. The tools are intended to fill the gap with some of the limitations with the current Edit Normals modifier included in 3ds Max.
- Filter From Current Selection (default: Off)
-
When On, the results of relevant selection functions will be limited to relevant normals that are a sub-set of the current set of selected Normals. For example, when on and the Select Border Normals is pressed, the resulting normals are only border Normals in the current selection. This option has no effect on the Invert Normals Selection function.
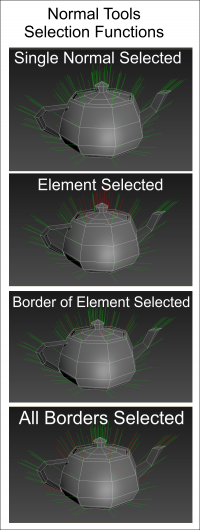
- Select Border Normals
-
This button will set the current Normal Selection to only those Normals along the mesh's border edges. This function can be bound to a keyboard shortcut with these macros in the wallworm.com category: Select Border Normals and Select Border Normals from Selection.
- Select Element Normals (Version 1.4)
-
This button will set the current Normal Selection to all Normals in the same geometric Element sub-object of the currently selected normals. This function can be bound to a keyboard shortcut with the Macro named Select Element Normals in the wallworm.com category.
- Invert Normals Selections
-
This button will invert the current Normal Selection. Unlike using the CTRL+I shortcut, the node does not need to be in Normal sub-object mode.
Apply To:
The UI for the Apply To controls what objects/sub-objects are used for the Normal application functions; these tools also determine whether Normal changes are derived from the global Normal value in the Normal Values section or whether individual normals will point at the Helper Tape's Target.
- Apply To
-
This menu determines what normals on an object will update when the Apply Normal button is pressed. The options are explained below:
- All Normals (default): All Normals in the object will update to point at the desired direction.
- Selected Normals: Only normals currently selected in each object's Normal sub-object mode will be updated. (When active, Live Target Mode is not available.)
- Selection (default: On)
-
When on, the results of the Apply Normal function are restricted to the objects in the scene's current selection. When off, only objects listed in the Objects to Edit list (below) are updated when Apply Normal is pressed.
- Objects to Edit
-
By default, this list box is disabled. To enable, un-check the Selection check box.
When enabled, only those objects listed in this menu are used for the Apply Normal and Live Target Move results. Click the Add (+) button to add selected scene nodes to the list. Press the Remove (-) to remove the currently selected object from the list.
- Point Normals to Target (default: Off)
-
When on, each edited normal will orient to point to the Helper Tape's target. When off (default) the current Normal value is applied to all edited normals.
- Apply Normal
-
When pressed, all relevant normals of all relevant objects (based on the current Apply To and Selection rules) will get updated to point at the new directions. The results are dependent on the Point Normals to Target option (above).
- Live Target Move
-
This check button will turn on or off an active display of the normals on relevant objects. When on, changes to the current Normal or Helper Tape Target will immediately affect the normal results upon mouse-up (so moving the target will show targeted normals when the move is finished). At this time, this mode only supports an Apply To set to All Normals.
- Stitch Colocated Normals
-
This function will average the vector of all normals derived from the same location. This is helpful for border normals that are not smoothed because their smoothing groups don't work for unwelded vertices.
- Offset Origin (Version 1.47)
-
This function is not available from the Normal Tools floater. This function is only present in the Normal Tools rollout of an Edit Normals modifier.
When the Use Offset Origin setting is on, the point from wich normals are derived from will be offset in orld space by the offset value. This is helpful when using functions like Out From Element Bottom, for example. In this case, if an Origin Offset value of [0,0,-16] is set, then the bottom point will be offset by -16 units in the world Z axis.
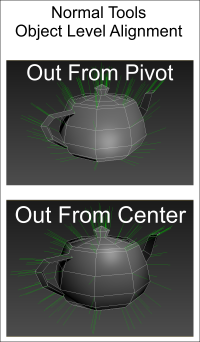
- Out From Object
-
 These functions allow you to quickly align the normals across an object in a way that is often helpful for foliage.
- Pivot (Version 1.2): When pressed, aligns all pivots out from the node pivot to the vertex.
- Center (Version 1.2): When pressed, aligns all pivots out from the node's center to the vertex.
- Face (Version 1.1): When pressed, the normals will align to the vector defined by the face center to the point from whence the normal originates. The results are dependent on the type of object being applied to: For Editable Poly objects, the normal aligns from the Polygon's Safe Center. For all other objects, the normal aligns from the Tri (face) center. Generally speaking, using Editable Poly is prefered.
- Elements Out From
-
 All of these buttons align the normals per Element sub-object.
- Centers(Version 1.4): When pressed, aligns all pivots out from the element center.
- Bottom (Version 1.4): When pressed, aligns normals from the bottom-most center of the element to the vertices in the Object's coordinate system.
- Base (Version 1.4): Similar to Bottom, this will align the normals with a vector from the bottom-most vertex in the element out to all the other vertices
- Near Pivot (Version 1.4): When pressed, aligns normals in each element from the vertex in that element that is closest to the pivot of the object.
- Near Center (Version 1.4): When pressed, aligns normals in each element from the vertex in that element that is closest to the center of the object.
Some of the Element-level alignment functions may not work well with some geometry, especially when there are several vertices that are equally valid for choosing a bottom or closest-to object center or pivot. Generally, the Align from Center and Bottom are the most appropriate for general useage. The others often require using the Apply To: Selected Only option.
- From Helper (Version 1.47)
-
If a helper object is assigned, the normals will all radiate from the pivot point of the helper object.
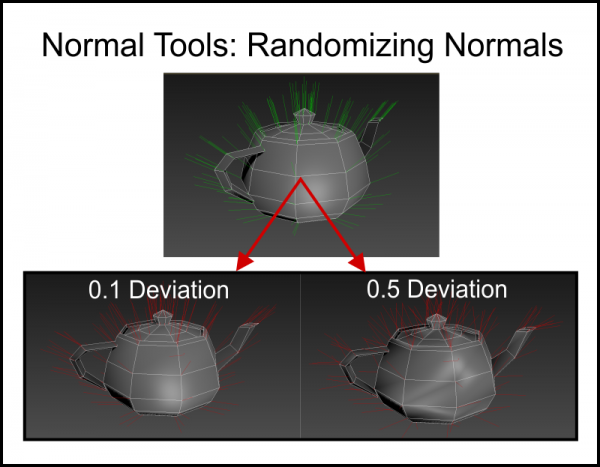
- Randomize
-
The Randomize function will randomly deviate the affected normals from their current vector based on the allowed randomize range. A low value will deviate the normals slightly. A high value (like 0.5) will create significant deviation. A value of 1.0 will make all normals completely random (and is probably not what you expect).

Requirements
You must own 3ds Max to use this tool set. To date, it has been tested in 3ds Max 2012-2021.
Installation & Upgrading
If you use the general Wall Worm Model Tools, Wall Worm Pro or Wall Worm Pro Pack, you should just install the latest version of that tool because Normal Tools is now included with that installation. Otherwise, you can install manually with the steps below:
- To install, copy the file named wallworm_normals.mse from the download file into your Scripts\Startup folder inside 3ds Max and restart 3ds Max.
- Copy the file named LaunchNormals.mcr from the downloaded zip onto your computer.
- In Max, click MAXScript > Run Script... and browse for the LaunchNormals.mcr that you copied.
- You must then add a menu or button to launch the tools via Customize > Customize User Interface and choose Wall Worm Normal Tools under the wallworm.com category.
Known Issues
- Using instanced Edit Normals modifiers is not fully supported with the Apply Normal function.
- In some versions of 3ds Max, you cannot select in the viewport a Tape Helper that was created by MAXScript. If this affects you, use the Get Helper button in the Normal Tools UI or use the Layer Manager.
Explicit Normals and Wall Worm
Many people who use Wall Worm for the Source Engine are suprised to find out that you can edit normals in any other method than using Smoothing Groups. Using the Edit Normals modifier will translate into your game's model as long as you are using the WW SMD Exporter and your WWMT settings have the Explicit Normals (and sometimes Auto) set for the Normals at export-time. See Export Correct Smoothing on Models.
Resources
Understanding the Edit Normals Modifier is key in using this tool. Here are some useful topics that may help you understand using Edit Normals more effectively.


