SMD, VTA and QC Importer
Note that these docs are for Wall Worm 2.4+. Importing via QC/SMD is no longer the preferred way of importing models into Max. You should utilize the MDL Importer if you have access to the MDL file (inside the game VPK or direct MDL files) and if the MDL importer supports the features you need.
You can import SMD, VTA and QC files directly into 3ds Max with Wall Worm. SMD files are used by the Source Engine to explain bone positions and faces of the model mesh. Wall Worm generates them to send to Source when you export a model. You can also generate them with third party model decompilers. You can also sometimes find source SMDs included as examples with various Source SDK content folders.
If you need to get a model from Source into 3ds Max, you must first generate the SMD (and/or QC) files. Once you have done this, you can run the SMD/QC Importer.
Import a Single SMD/VTA
If you just need to get a model into Source as a starting point or for reference, you can simply import the SMD. Click Wall Worm > Wall Worm Importers > SMD and QC Importer. Now browse for the SMD or VTA file. The model will be rebuilt in 3ds Max.
Importing a Complete Model from QC
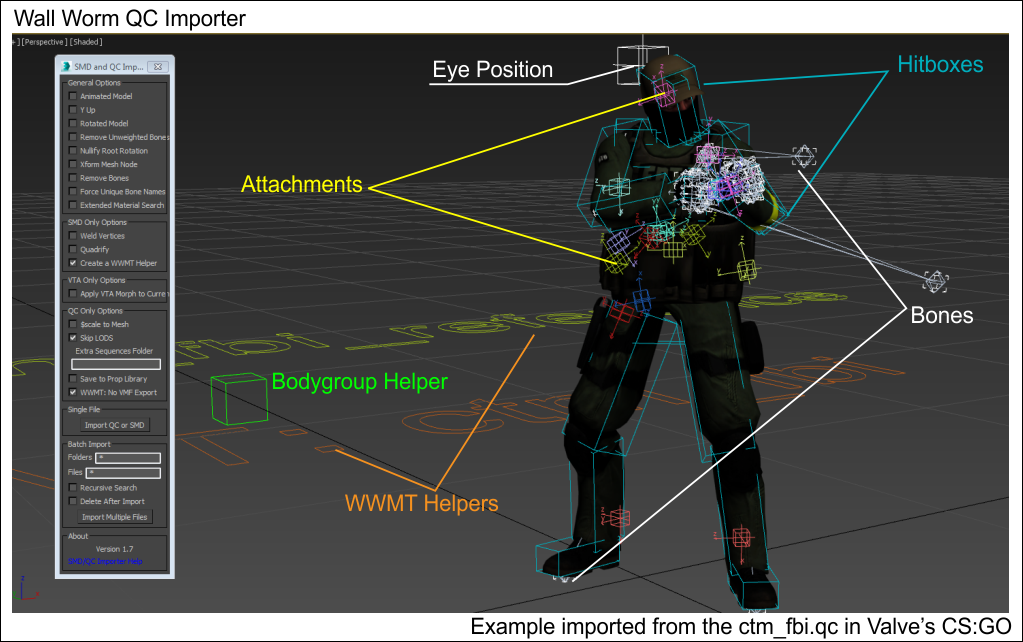
If you want to import a model, along with its collision hull and LODs (level of detail models) as well as some model settings, you should import the QC file. To import the QC, do the same thing as importing an SMD except that you should change the Files of Type menu in the import dialog from SMD to QC. This will let you import a QC. The following items are currently supported when importing a QC:
- $body/$model will import as the reference mesh
- $collisionmodel/$collisionjoints will import as the collision hull
- flexfiles
- $attachments
- $hbox and $hboxset
- $jointconstrain limits
- $jigglebone settings
- $definebone
- $alwayscollapse
- $lod # will import the LOD models
- $staticprop
- $opaque
- $mostlyopaque
- $concave
- $mass
- $inertia
- $damping
- $rotdamping
- $cdmaterials
- $sequence
- $shadowlod
- $contents
- More...
Many other parameters will get copied to the custom QCI file that WW always includes when exporting a model.

Getting Materials
The importers will also create materials for your models. But in order for this to work, the following conditions must be met:
For Max 2015+
- The material and textures files must reside in the Game materials folder or inside the VPK.
For Max 2014 and Older
- The model's materials (VMTs) must exist in the correct game folder when the export runs. This means that if the model has a VMT named mymaterial1.vmt and the model has a $cdmaterials of "models/mymodels/model1" then the file must be located correctly: GameDir\materials\models\mymodels\model1\mymaterial1.vmt.
- For the textures to appear in the material, the corresponding VTFs must be converted to TGA files and be in the correct location inside the sdk_content folders or your material library source path. So if the $basetexture of your material is "mytextures/model1base.vtf" then you must make sure that your materialsrc folder containes a subfolder called mytextures and inside that is model1base.tga. (This requirement is not necessary if you own Wall Worm Pro, which has native VTF support.)
- Note the differences of the placement of the VMT and the TGA files! The VMT file must be in the location of where it would be after written for the game; the TGA must be in the directory in which it must reside to compile correctly.
Considerations
- This tool is now deprecated in favor of the MDL Loader. The MDL loader will include all features in the QC importer when finished. If a feature is not yet implemented in the MDL Loader and you don't have the original QC/SMD, then you should read the Unpacking GCF and VPK Files and instructions on using Crowbar.
- When importing a QC that includes any flexfiles (VTA), the flexdata is applied to a Morpher modifier. You'll need to manually move that Morpher modifier to below the imported Skin modifier in the Modifier Stack in order to see skeletal animations.
- When there is a Skin Modifier and a Morpher modifier in the modifier stack, the normals (smoothing) will be poor until you move the Morpher to below the Skin modifier. The quality of the normals is better in later versions of Max.
- You should generally always use the Single Mesh option unless you have a specific need for each mesh-node to be a separate object in Max. The Single Mesh option is much faster than not using single mesh, especially if the model has a lot of nodes that also have root geometry. If you do not understand the meaning of this sentence, then keep Single Mesh ON.
- When importing a QC, the importer often encounters sequence SMD files that do not have an identical bone structure as the reference mesh (like a missing joint). In those situations, the bone missing from the sequence SMD is usually in the incorrect place during that sequence--causing stretching. You'll have to manually fix those bones' animations until WW has found a way to interpolate the animations.
- During the import of a QC file, all commands WW doesn't understand get dumped into the QCI file. You should open that file with the QCI button in WWMT UI to verify the integrity of that data--as it will be used in future exports of the model. Not knowing about the QCI file could create unexpected results when you recompile the model, so checking it is always a good idea.
Known Issues
- If a QC file doesn't end with newlines, it can cause the parser to crash.
- Importing Source Assets
This series covers the steps needed to re-use Source assets inside of 3ds Max.
- Unpacking GCF and VPK Files
- SMD, VTA and QC Importer
- Prop Libraries
- Using Props in Your Scene
- Related Topics


