Convert Scene to Model
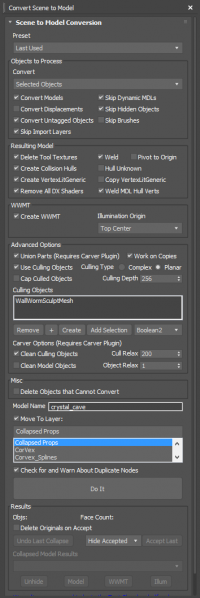
If you need to convert a scene to a single model (or large sections of a scene) you can use the Convert Scene to Model utility. The tool is found in Wall Worm > Wall Worm Model Tools > Convert Scene to Model. In many cases this tool is used for clustering props (to reduce prop count in a scene).
When you run the function, the tool can collapse the targeted objects (scene or sub-selection) into a single object, delete most tool texture faces, weld vertices and create a WWMT Helper for the object to export as a model. This tool was intended as a replacement for Propper (converting imported VMF files into models) but can be used on arbitrary scenes. The video below shows an actual culling of a level in Black Mesa to cluster rocks and cull them to the landscape. Please read the Known Issues before using this tool. For best results, use 3ds Max 2021.3+.
Converting Scenes to Models
Converting a set of props into a single prop is simple.
Simple Steps for Converting
- Open Convert Scene to Model
- Select Objects in Scene to convert
- Set the Convert option to Convert
- Set relevant options (like Weld, Delete Faces with Tool Textures, Convert Models and Generate Collision Hull).
- Click Do It.
- Review your results and click Accept Last to move onto next object.
- Repeat on next set of objects to convert
See Optimizing your Scene below for tips on preparing your scene for clustering.
Exporting the Model(s)
For the most part, exporting the model itself should be as simple as selecting the WWMT Helpers generated in the scene and clicking Wall Worm > Wall Worm Exporters > Export WWMT To Source Models.
Explanation of User Interface
- Convert
-
Choose the objects to convert: Selected Objects or the Entire Scene.
- Skip Hidden
-
Skip all hidden objects in the new model.
- Skip Import Layers
-
Skip objects that are part of hidden Utility Layers that WW creates during QC imports.
- Convert Models
-
Include model props. When off, ignores objects of the WallWormMDL class.
- Skip Dynamic MDLs
-
When on, will skip models that were not compiled with $staticprop.
- Convert Displacements
-
When off, skips displacement objects. If you convert displacements, you will need to do extra work for baking blends.
- Convert Untagged Geometry
-
When on, will use any geometry in selection/scene unless filtered with displacement/model options. When off, only objects that would normally export as brushes (and MDLs/displacements) will get collapsed.
- Skip Import Layers
-
The function will skip objects that are put in standard utility and import layers created by WW.
- Delete Faces with Tool Textures
-
Delete the faces of the model with textures that have the word "Tool" in them.
- Weld Verts
-
Weld the vertices of the model. The spinner to the left defines the maximum distance at which vertices can weld.
- Create WWMT
-
Generate a WWMT Helper with the resulting model to re-export into Source
- Pivot to Origin
-
Place the model's pivot at the world origin.
- Illumination Origin
-
Set options for where the illumination origin should be.
- Create Collision Hulls
-
Generate a Hull from each Element of the model. Warning: this can be slow with large scenes!
- Delete Objects that Cannot Convert
-
Delete skipped objects from the scene. Do not do this if there are objects you need to keep like entities.
Advanced Options
- Union Parts
-
This function requires the Carver plugin to be installed. The tool will remove all intersecting faces of the resulting model.
- Use Culling Objects
-
This setting will cull away any geometry that intersects with the culling objects. Uses include removing faces of props that are hidden under a displacement, etc.
- Boolean Mode
-
This menu will allow you to choose which method to use for the Boolean actions. When using 3ds Max 2020+, this should always be set to Boolean 3. For older versions of Max you may choose different modes to find the best results. In most cases, use Boolean 3 for versions of Max that support it; if the Boolean 3 option fails, you should usually choose ProBooleans. See the Known Issues for more information on Boolean 3 in older versions of Max.
- Create Bounding Around Selection
-
This button will create a bounding box object that can control faces to remove from other objects. The purpose of this object is to help reduce the size and complexity of objects used in the culling process.
When pressed, you will be prompted to choose an option. Clicking Yes will turn the first object in your selection into the object that WW will consider as the object that defines a culling region. If you press no, WW creates a new Box object that is assigned as a culling region.
- Auto Bound
-
This button toggles a mode that will automatically cull objects using the Cull modifiers whenever the current scene selection changes. This is helpful if you are proceeding thtough a scene and want complex Culling Objects (like a Dispalcement Proxy) to automatically shrink to match your current scene selection.
- Cull
-
This function has two actions based on if you Left-Click or Right-Click. Both work on your current selection.
Left-Click: A Vol.Select modifier is added that will be added with Select By Object set to the Bounding Object created with the Create Bounding Around Selection button and Stack Selection set to Face and inverted (so that only faces outside the selected volume are selected up the stack. Next a Delete Mesh modifier is applied that will delete faces that are not inside the bounding area.
Right-Click: This function does the same thing as a Left-Click but it also adds these modifiers: A Shell Modifier to add depth to the selected Object. A Volume Select to pass up the stack only faces created by the Shell; A Relax modifier that will relax the resulting created faces; A Turn to Poly modifier to triangulate the meshes.
The right-click option is recommended but was not added as default action because it was a changed workflow that might have interrupted users using the previous option.
Using the Bounding functions
When working with a large scene (for example, the scenes in Black Mesa's Xen chapters), here are the workflows that work best:
- Generate a Displacement Proxy if there isn't already in the scene (in the displacement floater, click Create a Displacement Proxy).
- Open the Visgroup Manager and Hide All displacements but unchecking the Displacements checkbox in the Auto Visgroups Section.
- Unhide your Displacement Proxy by checking the Displacement Proxies in the Auto Visgroups section.
- Open the Convert Scene to Model floater.
- In the Advances Options, turn on Use Culling Objects.
- Select your Displacement Proxy in the scene.
- In the modify tab click the Create Cull Material button.
- In the Convert Scene to Model floater, click the Add Selection button below the Culling Objects list to add your displacement proxy to the culling objects.
- Select a set of Props in the scene you want to cluster.
- Click the Create Bounding Around Selection button. When prompted, click No to generate a new Bounding Box object.
- Select your Displacement Proxy again and Right-Click the Cull button.
- Click the Auto Bound button to turn on the function.
- Now select props to cluster again. Notice the displacement proxy now adapts to your selection.
- If you need to adjust the depth of the shell or the amount of relax on the displacement proxy, temporily turn off the Auto Bound setting, select the displacement proxy and adjust its settings in the modifier stack. Then turn on Auto Bound again and reselect the props you wanted to cluster.
- Run the cull functions.
- Now continue culling sets of props by repeating steps 13-15 until finished.
- You cannot use Sculpt Meshes with the Cull button. You should only ever use a Displacement Proxy. Trying to use a Sculpt Mesh is blocked by WW but if it is manually added via scripting or outside this menu, you can adversely affect your scene and destroy important data. Do not use sculpt meshes for this process!
Optimizing your scene for Clustering
This document details methods for efficiently setting up your scene to cluster with the Convert Scene to Model tool in Wall Worm. There are two main functions in the Convert Scene to Model tool:
-
Clustering multiple meshes into single WWMT Helper models.
-
Culling (deleting) faces that the player never sees.
Clustering
Clustering (merging meshes) takes the least amount of preparation but still takes planning. These are things to consider for merging. When using Convert Scene to Model, Clustering is always performed.
-
When merging multiple objects into a single model, you should consider the physical dimensions because large models often do not light well in Source. Consider creating clusters of objects that are in relatively limited spaces and have similar lighting angles.
-
There is a limit on the number of vertices allowed in each model. Exact limits are dependent on different versions of Source. If the set of objects to cluster have over 24 thousand vertices, you might consider using less objects in the cluster. There is also a face count limit. *Culling (below) can help reduce mesh resolution.
-
There is a limit to the number of materials that can be on a single model. This limit is classically 32 materials. Normally, each MDL has its own material--meaning that if you are clustering more than 32 different MDLs, the resulting model will fail. This number is even less if the MDLs have multiple materials in them.
-
If you need collision models on your clusters, it’s best to cluster MDL nodes that already have hulls. This will reduce the amount of work to create hulls. However, if the collision model has more than 20 elements, it will be considered expensive.
-
All clustered props become static props. This is why the default options have Skip Dynamic Models turned off--since any animations or dynamic attributes of such MDL nodes will be lost if clustered.
Culling
Culling is the process of removing all faces the player cannot ever see. Culling normally reduces the polycount and total drawcalls. However, the process of culling has several requirements and is often time-consuming. The culling tools in the Convert Scene to Model are designed to help you cull your scene more efficiently. Unlike clustering, culling is optional in Convert Scene to Model.
Challenges you will face
The culling tools in Wall Worm utilize the Boolean functions inside 3ds Max. There are several boolean tools in Max that Wall Worm can use. The Convert Scene to Model lets you choose among these options: ProBoolean, Boolean2 and Boolean3* (Boolean3 is only available in 3ds Max 2018+). Sometimes a setup will work best with ProBoolean, other times with Boolean3.
Here are some important considerations for culling:
-
Watertight models (those with no open edges) work best. If the model isn’t watertight it is likely to cause problems with the boolean functions. Seal your models before culling.
-
Displacements and Sculpt Meshes should no longer be used as culling meshes. Instead, use Displacement Proxies and Sculpt Proxies.
-
Culling may work best if you apply a Turn To Poly modifier onto the Culling Mesh(es) and set them to Limit Polygon Size to 3 (triangulating the mesh).
-
Watertight culling meshes are also prefered.
-
If the models or culling meshes have self-intersecting faces, the culling function will almost certainly fail.
-
Because the boolean functions require sealed meshes, models and culling meshes are generally welded and holes are capped. When done automatically, the odds increase that there will be self-intersecting faces (and causing a failure). This is why you should carefully seal your objects.
-
For MDL nodes that are not already sealed (but are already compiled) you can choose to recompile them as sealed (which may add extra polys in previously compiled levels) or you can create a Substitute mesh. A substitute mesh is one that is used instead of the MDL mesh and is referenced via a Substitute Modifier. You can create this by selecting a MDL with an open edge and clicking the Create Substitution button in the MDL Node’s MDL Utilities rollout (WW 3.748+). Once created, edit that new mesh (sealing it and removing self-intersecting geometry) before culling the meshes. Edits to the substitute mesh will propagate to all the MDL nodes in the scene using the same MDL file.
Re-Clustering Props
Sometimes you may need to edit a cluster of props. To do this, you must have not turned on the Delete Original on Accept option when creating the cluster.
Remaking Clusters with WWMT Helpers
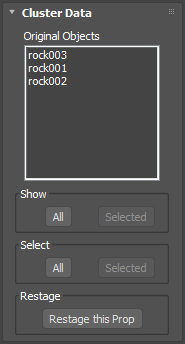
 If your cluster had an automated WWMT Helper generated with it, you will find a new rollout at the the bottom of the modify tab when you select the WWMT Helper called Cluster Data. That rollout list all the original mesh nodes that created the cluster. It also includes some functions to select the originals as well as to restage the prop. If you restage the prop, the current cluster, the WWMT Helper and all extra parts of the clustered prop will be deleted and the original nodes will be reselected--this allows you to rebuild the cluster with the Convert Scene to Model functions.
Converting Displacements to Models
To convert Displacements to Models, you need to turn on the Convert Displacements option in the Objects to Process section and turn on the Create VertexLitGeneric in the Resulting Model section. When you do this, the a copy of the displacement will be created that is no longer known as a displacement in Wall Worm (meaning you can edit it).
For best results, use 3ds Max 2021.3+ so that the 2/4-way blends can be converted into OSL-driven materials that can be baked to textures. Note that because OSL does not understand channel -2 (The vertex alpha channel) you will need to copy the Vertex Alpha channel to channel 0 for the OSL maps if this is a 2-way blend (derived from a WorldVertexTransition). To do this:
- Select the new displacement model.
- Click Tools > Channel Info.
- Select the Vertex Alpha Channel (-2:Alpha).
- Right-click the selected channel and choose Copy.
- Select the vertex color channel (0:vc).
- Right click the selected channel and click Paste.
Note that you do not need to copy channels for 4-way blends since those use Channel 10 which OSL can use.
Known Issues
There are some known issues with this tool. Those are outlined below. Best results will be found when using 3ds Max 2021.3+.
- Undo does not work. This is a limitation of most of the boolean maxscript functions. You should never hit Undo (CTRL+Z) after pressing the Do It button in the tool. Instead, if you do not like the results, click the Undo Last Collapse button. This will revert the model as long as you are using the Work on Copies option. If you click Undo (CTRL+Z) instead of using the Undo Last Collapse button, you may cause Max to crash.
- Boolean3 only keeps a single material. This is a bug in the MAXScript implementation of Boolean3 inside 3ds Max 2018 and 2019. 3ds Max 2020+ is not affected by this bug.
- Some Culls and Unions can crash Max. This is related to rounding errors inside Max during a boolean in 3ds Max 2018-2019. This bug is fixed in 3ds Max 2020+ when using Boolean 3.
- Porting Levels
Articles related to porting levels into Source using 3ds Max and Wall Worm.
- Porting Levels into Source
- Convert Scene to Model
- Related Topics


