Blend Materials and WorldVertexTransition
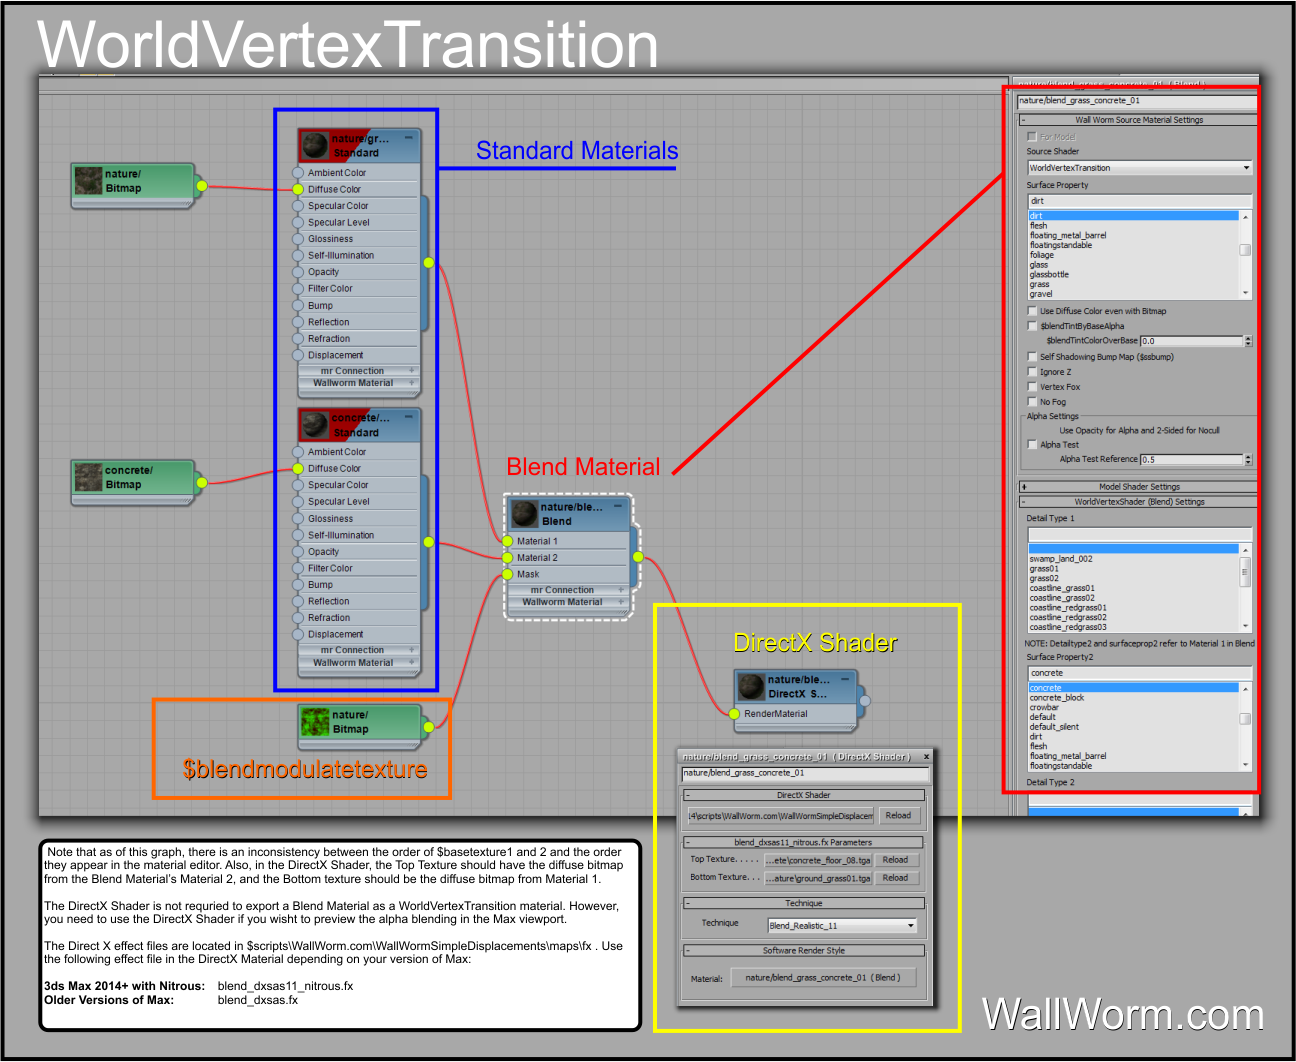
In Source there is a material specifically designed for Displacements. This Shader in Source is called the WorldVertexTransition shader. The type of 3ds Max material that exports to WorldVertexTransition is the Blend material. Unfortunately, the Blend material does not yet have realtime viewport preview with masks such as a Vertex Alpha--which is why there is an extra helper material used in Wall Worm to preview blends that use vertex alpha.
In a Blend (Max) the main material refers to two sub-materials; WorldVertexTransition (Source) is a material that has two sets of parameters for each standard parameter ($basetexture and $basetexture2). Wall Worm will map the Blend to a WorldVertexTransition upon export. These materials blend across objects based on a mask; in Source, this mask is baked into the Vertex Alpha of displacements, and is further enhanced by special bitmaps called $blendmodulatetexture.
Tips
- The order of the materials may seem a little un-intuitive. Material 1 equates to $basetexture2 and Material 2 equates to $basetexture. Keep this in mind when setting up the blend materials.
- When painting your alpha, WHITE paints an alpha to show Material 1 ($basetexture2) and BLACK paints an alpha to show Material 2 ($basetexture).
Automatic Blend Creation
- Create Blend Material.
- Apply the Blend Material to an object in the scene (like a displacement).
- Select the object(s) with the blend materials.
- Click Wall Worm > Wall Worm Materials > Convert Blend/Composite to DX Shaders.
Manual Blend Creation
- Create two Standard Materials, each with their own diffuse bitmap.
- Create a Blend Material.
- Pipe the two standard materials into the Material 1 and Material 2 slots of the Blend.
- Create a new DirectX Material
- Add the blend_dxsas11_nitrous.fx (Max 2014), blend_dxsas.fx (older than Max 2014) or WorldVertexTranstion.fx (Max 2015+) to the effect file of the DirectX Material.
- Put the diffuse bitmap from Material 1 into the Bottom texture of the DirectX Material.
- Put the diffuse bitmap from Material 2 into the Top texture of the DirectX Material.
- Pipe the Blend Material into the Render Material of the DirectX Material.
- If you want to set advanced settings for your blend material, convert it to a Wall Worm Material.
- Using Materials
-
- Source Shader Settings
- Blend Materials and WorldVertexTransition
- Using 4Way Blends
- Related Topics


