Collision Model & Physics

The collision model is a convex geometry that defines the physical boundaries of the model. Generally speaking, this model should be a low-poly copy of your model broken up into convex pieces. If possible, use a single convex shape for the model! If there are more than one pieces to your collision model (either separate scene objects or meshes with multiple Element sub-objects), remember that you will have to later set the $concave flag.
Learn more about Generating a Collision Hull.
Note that there is an option in the WWMT Settings (as of Version 1.0) called Processed Hulls become Non-Renderable that you can turn on/off. When set, all hulls added to a model (or meshes processed by the collision hull tools) are made non-renderable. This, however, should be turned off if you have also turned on the new Export Non-Renderable Mesh as Bone.
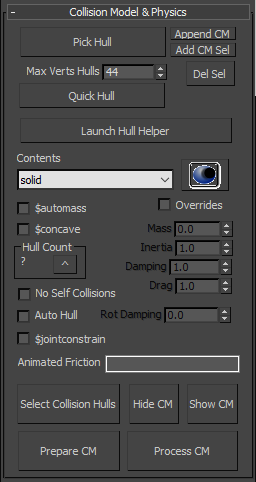
- Pick Collision Model
-
Click this button so that you can then select the root Collision Model (also called a Collision Mesh or Collision Hull). The Collision Mesh should be a convex piece of geometry that has a unique smoothing group applied to each convex piece.
- Even though the Collision Model does not ever display in-game, it still needs to have a material. (The Process CM button does this for you.)
- If you need a $concave hull, click the Process CM button after all hulls are added to the model.
- Append
CM -
Click this button so that you can select a single mesh to add to your Collision Model. This will add a mesh to your Collision Model. If you need to add multiple objects, see Add CM Sel below.
- This button is inactive until you have selected a model with the Pick Model Button and a Collision Model with the Pick Collision Model button.
- Add
CM Sel -
Pressing this button will automatically add all selected objects to the Collision Model. Please see the hints above for Append CM.
- Delete
(CM) Sel -
Pressing this button will automatically remove all selected objects from the Collision Model. Please see the hints above for Append CM.
- Quick Hull
-
This button will generate a convex hull for each Element sub-object of each mesh in your hull. It utilizes the nVidia PhysX plugin for 3ds Max (now bundled in 3ds Max 2012+ as MassFX).
- This button is inactive until you have selected a model with the Pick Model Button(and even then inactive until the feature has been included).
- You can only use the hull generation built into WWMT using MassFX (Max 2012+).
- Launch Hull Helper
-
Launches the Hull Helper Floater.
Collision Model & Physics Settings
- Concave | $concave
-
Tells the compiler that the Collision Mesh should be broken up into the individual objects and their Element sub-objects. If not set, the collision mesh objects are converted to a single convex mesh.
- Remember that every mesh in the collision hull must have a smoothing group applied to it.
- If an object in a collision mesh has multiple Element subobjects, each Element must have a unique smoothing group.
- Contents | $contents
-
This menu lets you choose the content_type of the model. The default is solid.
- See $contents on VDC
- If your model has a skinned mesh (with bones) then the tool will also create a $joincontents entry for each bone that matches this setting. To make any bone differently, use Advanced Bone Settings.
- Mass Center | $masscenter
-
Click this icon to create a $masscenter point helper (or select the model's $masscenter helper if one was already made). This will create the center of mass for your model. By default, the model's center of mass is at its origin--this will let you move that to an appropriate spot.
- The $masscenter helper is blue by default.
- See the VDC entry for $masscenter
- Auto Mass | $automass
-
Click this setting if you want the mass of the model to be determined automatically based on the model's $surfaceprop.
- Clicking this option will override any value entered in the Mass spinner.
- Auto Hull
-
Check this option if you want studiomdl.exe to create a collision hull from the base model mesh. Using this option means that you do not have to create a collision mesh.
- You should not use this for animated models.
- When using this option, you probably also want to turn on $staticprop.
- If your model has multiple meshes or Element sub-objects, and you want the collision hull to "shrink wrap" to these, you will need to click the $concave option.
- Overrides
-
Turn this on to manually set the Physical Properties of this model (like the mass, inertia, etc). When on, activates the override spinners for those properties.
- Mass | $mass
-
Manually set the mass of the model in Kilograms.
- This value will be ignored if you set the $automass flag.
- Inertia | $inertia
-
Manually set the inertial scale.
- Damping | $damping
-
Manually set the damping scale.
- Drag | $drag
-
Manually set the drag scale.
Hull Utilities
- Select Collision Hulls
-
Click this button to select all objects in the scene that are part of your collision hull.
- Hide Collision Hulls (Hide CM)
-
Hides all meshes that are part of the collision hull.
- Show Collision Hulls (Show CM)
-
Shows (unhides) all meshes that are part of the collision hull.
- Prepare Collision Model (Prepare CM)
-
Click this button to select a mesh to prepare for becoming a Collision Hull. When you've clicked this button, then select a mesh in the scene. Be aware it only works on one mesh at a time. Here is what it does:
- The item is converted to an editable poly
- Each Element sub-object is given a unique smoothing group
- A texture is applied to the object
- Object is set to non-renderable
- Process Collision Model (Process CM)
-
Click this button to automate the Prepare CM function (see above) on each mesh in the Collision Hull.
- This function differs from the Prepare CM in that meshes are not converted to Editable Poly. When using this function, objects that are not an editable poly are given a Smooth modifier. Note that if you use this function multiple times, the tool will keep adding new Smooth modifiers.
- WWMT Rollouts
Rollouts on Wall Worm Model Tools.
- Making Collision Models
Articles about making collision models.
- Collision Hulls in 3ds Max for Source
- Hull Helper
- Hitboxes and Bone Properties
- Collision Model & Physics
- Related Topics


