Attachments & Particle System UI
Attachments are points on your model where you can attach extra models and particle systems (guns, sprites, etc). This page details both Attachments and Particle Systems since the Particle System controls are also in the attachment rollout.
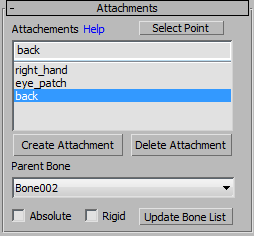
Attachment Section
- Select Point
-
Selects in the viewport the attachment point that is currently hilighted in the list of points.
- Name Attachment
-
Enter an attachment name in this field if you want to create a new attachment.
- To actually make the attachment, you have to press the Create Attachment button after setting a name.
- WWMT does not check to see if your attachment name is a valid name. You should not use any spaces or special characters other than an underscore. Use only letters, numbers and underscores.
- Pick Attachment
-
If you already have attachments made, you can select them from the list to edit their attached bone and other settings. You can also delete an attachment that you've selected.
- Create Attachment
-
Press this button after entering a name for a new attachment into the Attachments name field.
- Delete Attachment
-
Deleted the attachment selected in the attachment list.
- This action cannot be undone!
- Parent Bone
-
Select the bone this attachment point is controlled by. The bones listed are those that are in the root model's skin modifier (if present). You can also make the parent bone set to nothing by choosing the first empty item.
- Absolute
-
Parented to the model's origin (but according to VDC the attachment offset is still relative to the designated parent bone--which isn't exactly clear).
- Rigid
-
Set this option if the parent bone does not move.
- Update Bone List
-
This will refresh the Parent Bone List to show all the bones that are included in any skinned meshes that are part of the model.
- There is a bug in the current implementation where the bones are not refreshed if the Skin modifier isn't the top modifier in the modifier stack. Move the skin modifier to the top of the stack if you are having problems.
- Learn more about attachments on the VDC: $attachment and Attachments.
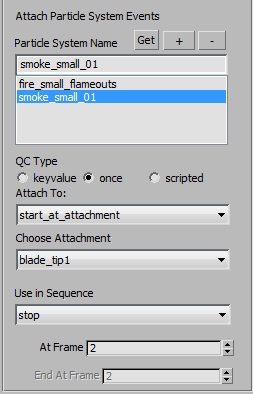
Attach Particle Systems and Particle Events
WWMT does not have an interface for creating custom particles yet. However, it does allow you to assign particles from some popular mods (HL2:EP2, L4D, Portal, Tf2 and CS:S) or any custom particles you have made.
- Get Particle System
-
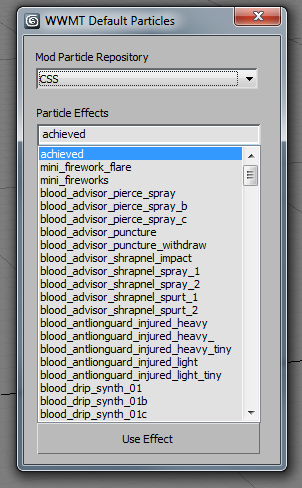
Press this button to get a list of common Mods (L4D, Portal, TF2, CS:S and HL2:EP2) and the particle systems that are part of those mods. Note that the list is probably incomplete and/or inaccurate as it was derived from the VDC.
Simply choose your Mod from the Mod Particle Repository menu. Then you will see a list of known Particle Effects for that mod. Choose the system to use and click the Use Effect button. That system will be added to the system of this model.
- Add Particle System
-
Press this button to add a particle system that is named in the System Name field.
- Remove Particle System
-
Press this button to remove the particle system that is selected in the Pick System combobox.
- System Name
-
This is the name of the currently selected system. Enter a name here and press the Add Particle System button to add a new system to the list.
- Pick System
-
This is the current list of particle systems assigned to the model. Select one to change its parameters.
- QC Type
-
This radio list detemines how the particle system is written to the model.
- keyvalue
-
When set, the particle system will be written into the keyvalue block of the QC and will continuously spawn from the designated Attachment point (either an origin or attachment point).
The output of this type of particle assignment will look like this in the QC:
					$keyvalues {
  "particles"
  {
   "effect"
   {
    name  "env_fire_small"
    attachment_type  "follow_attachment"
    attachment_point  "yippeee"

   }

  }

}
*Where attachment_type will be controlled by the Attach To menu and the attachment_point is controlled by the Choose Attachment menu.
- This type does not use the Use in Sequence Menu.
- This type does not use the At Frame menu.
- This type does not use the End At Frame menu.
- once
-
When set, the particle system will be written into a sequence block of the QC and will spawn from the designated Attachment point (either an origin or attachment point) at the frame designated by the At Frame menu.
The output of this type of particle assignment will look like this in the QC if assigned to a sequence called "stop" and the At Frame is set to 2:
					$sequence stop "stop" fps 30 {
{ event AE_CL_CREATE_PARTICLE_EFFECT 2 "smoke_small_01 start_at_attachment blade_tip1" }
}
*Where attachment_type will be controlled by the Attach To menu and the attachment_point is controlled by the Choose Attachment menu.
- This type does not use the End At Frame menu.
- scripted
-
When set, the particle system will be written into a sequence block of the QC and will spawn from the designated Attachment point (either an origin or attachment point) at the frame designated by the At Frame menu.
The output of this type of particle assignment will look like this in the QC if assigned to a sequence called "stop" and the At Frame is set to 3 and End At Frame is set to 14:
					$sequence stop "stop" fps 30 {
{ event AE_START_SCRIPTED_EFFECT 3 "smoke_small_01 start_at_attachment blade_tip1" }

{ event AE_END_SCRIPTED_EFFECT 14 "smoke_small_01 start_at_attachment blade_tip1" }
}
*Where attachment_type will be controlled by the Attach To menu and the attachment_point is controlled by the Choose Attachment menu.
The values may not all work with every particle system! You may have to have special systems to work in different cases. See the Particle System docs for more details.
- Attach To
-
This menu controls the attachment type this system uses. You have the following choices:
- Start at Origin
- Start at Attachment*
- Follow Origin
- Follow Attachement*
*To use the start/follow attachment options require there be existing Attachments listed in the Attachment UI above.
- Choose Attachment
-
This menu will only be available if there are existing attachments in the Attachment UI above and the Attach To menu is set to Start at Attachment or Follow Attachment.
This value is the point at which the particle will spawn.
- Use in Sequence
-
This value only works if you have Sequences assigned in the Sequence rollout and the QC Type is set to once or scripted.
This tells the QC to use the particle system in the designated sequence.
- At Frame
-
This value sets the frame for a Once type particle to spawn, or the start frame of a scripted system event.
- End At Frame
-
This value sets the end frame for a scripted system type.
Considerations
Particle systems can adverse effect the performance of a model or level. You should be very careful when implementing them.
WWMT does not do any kind of error checking... so if you use a system that is not available or inappropriate for the particular scenario, you will have to troubleshoot the problem manually.
- WWMT Rollouts
Rollouts on Wall Worm Model Tools.
- Related Topics


