Mass Model Fetch
 The Mass Model Fetch utility is available in Wall Worm 3.04+ . This utility works in 3ds Max 2015+ and allows you to mass import props into a scene. It was developed mainly to augment work for Black Mesa, but all WW users get to benefit from it.
To properly use this utility, you must have your paths properly configured for a game. The tool will fetch models and materials directly from the game (including those embedded into VPK files).
General Usage
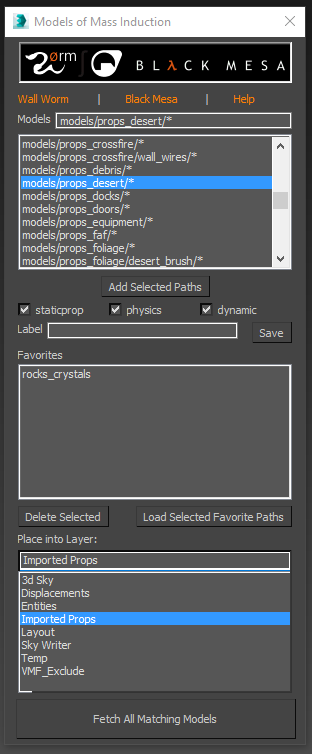
To use the Mass Model Fetch utility, click Wall Worm > Wall Worm Importers > Mass Model Fetch. Once open, you should see a list of the folders available in your current game. You can select one or more (hold down CONTROL or SHIFT to select multiple paths) and then hit Add Selected Paths to add the paths to the Models list. Then choose what kind of props you want to import (staticprop, physics props, dynamic) and then hit the Fetch All Matching Models button.
Now the tool will import all matching models and place them into the layer selected in the Place into Layer menu.
Now you can make copies in the scene or use them with other tools like Object Paint, Itoo's Forest or PropLine. These props will natively export as props when you export the scene as a VMF.
See how this tool was used when setting up a scene full of foliage in the following video:
User Interface
- Models
-
This field is a comma-separated list of path and files to match. You can use the asterisk (*) as a wildcard symbol. If you wanted all models from the models/doors folder and all the models from the models/props_foliage folder, you would set this to "models/doors/*,models/props_foliage/*". You can also specify file names. If you set this to just "*flag* then any model with a path that includes the word "flag" or a model file name with that in the file name will be used.
- Paths List
-
This list is all the paths found in your game. It's a list of convenience to fill out the models field. Double-clicking any path will append that filed to the Models field. You can select multiple fields by holding down CONTROL+Select.
- Add Selected Paths
-
This will append the currently selected paths from the Paths List to the Models field.
- staticprop
-
When selected, staticprop models will be brought into the scene. If not, staticprop models will be skipped.
- Physics (NOT YET IMPLEMENTED)
-
When selected, models with phsics data will be brought into the scene. If not, phsyics props will be skipped. Note that this option is not yet implemented.
- Dynamic
-
This field is will allow any model that is not a staticprop to be imported.
- Label
-
This field is for creating a Favorites preset. It will save a preset with the current Models paths and the staticprop, physics and dynamic settings. You can then load that favorites later.
- Favorites
-
This is a list of previously saved favorites. Select one or more presets and then click Load Selected Favorite Paths button.
- Delete Selected
-
This button will delete the selected favorites presets.
- Load Selected Favorite Paths
-
This button will load all the paths in all the selected favorites. It will also turn on the staticprop if any of those favorites have staticprop; physics if any of the favorites have physics; dynamic is any of the favorites have dynaimc. Those flags will be turned off respectively if none of the favorites have them.
- Place Into Layer
-
This menu determines the layer to place the imported props. The default is "Imported Props" but you can choose any other layer that exists in the scene.
- Fetch All Matching Models
-
Clicking this button will run the import. If the function discovers many matching props, the action could take a while. You should avoid using model paths that would select too many models (like a path that includes "models/*) as that will fetch all models in the game and might crash you system by using too many at once.
- Importing Models
Articles and documents related to importing model assets into 3ds Max.
- MDL File Loader
- Mass Model Fetch
- Related Topics


