DMX, SMD and VTA Exporter
The DMX/SMD/VTA exporter in Wall Worm Version allows you to manually export individual DMX, SMD and VTA files independently of the Wall Worm Model Tools.
This Tool includes:
- DMX Exporter*
- SMD Exporter
- SMD Sequence Exporter
- VTA Exporter
These exporters work with all versions of Max where Wall Worm works, including 3ds Max 2013, 3ds Max 2014 , 3ds Max 2015, 3ds Max 2016, 3ds Max 2017, 3ds Max 2018 and 3ds Max 2019. *The DMX exporter is only available if you have Wall Worm Pro installed.
Generally speaking you should use the exporter built into Wall Worm Model Tools and the WWMT helpers; the manual exporter is for people who want to manually write out their QCs or to manually overwrite a DMX/SMD/VTA file created by Wall Worm.
You can access this exporter UI by clicking Wall Worm > Wall Worm Exporters > Export DMX/SMD/VTA File.
The same UI is used for DMX, SMD Reference, SMD Sequence and VTA files.
Explanation of the UI
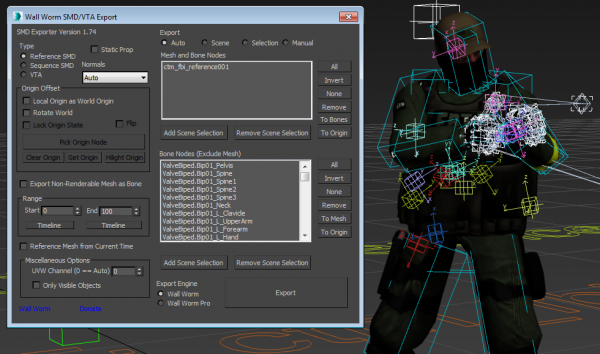
The UI of the SMD Exporter gives you control of the elements that get exported, the state of the mesh to export (frame #), the reference system to use for the bones and vertex positions, what objects to export and UVW channel to use.
Type
This list determines what type of file you are exporting. The types are Reference, Sequence and Flex.
- Reference will export the model's bones and vertexes at the designated time (at the Range Start frame which defaults to 0) or at the current frame in the timeline if you have the Ref from Current Time checked. This creates a reference SMD.
- Sequence will export a sequence SMD that exports the positions and rotation of all the bones in the model at all the frames in the Range spinners.
- Flex exports vertex morphing information for the models in the range specified. When the DMX checkbox is off, the files export as VTA. VTA files are needed for facial animations and using flex commands. The range start and end denote the frames that will get exported. When the DMX checkbox is on, the file exports as DMX and only uses frame 0. With a DMX, all channels in the Morph or Morph-O-Matic export as control channels in the DMX file.
DMX
When turned on (requires Wall Worm Pro) the output file type is a DMX file regardless of the type chosen above. When off, the file type is SMD for Reference and Sequence types, and VTA for Flex.
Static Prop
This checkbox lets the exporter know that there are no moving parts. This option is useful when exporting static props.
Origin Offset
The origin offset functions are not something that has traditionally been part of exporting SMDs. In the past, all $origin-related calculations were done in the QC file. But when Valve updated the compilers for some of the most recent mods, the $origin command either stopped working or started working differently. For this reason, WW now has the $origin values calculated into the SMDs.
Understanding how these values work is important but will be covered in another document.
Use Local Origin as World Origin
This option does the same thing that the same setting in WWMT does. When unchecked, all bones and vertices are calculated from their PRS (position, rotation and scale) in World Space. When checked, the bones and vertices are calculated from the Origin Node in the selection.
By default, the origin node is the first object that was created in the current scene (if exporting a scene) or first object in the selection (if exporitng selection). More in this below. To see what the current Origin Node is, you can click the Hilight Origin button and the Origin Node will flash. But you can set your own node too.
If the Use Local Origin as World Origin option is not checked, none of the Origin-related functions below have any effect in the export.
Pick Origin Node
Use this button to set the Origin Node manually. This is important to do if you want a set of models that are separate to export in the same reference system. For example, if you want to export three bodygroups SMDs along with a main SMD, you need to make sure that all of the exported SMD files are using the same node (either geometry or bone) as the Origin Node.
Clear Origin
This button unsets the current origin and the origin node falls back to the default (which depends on whether you are exporting a scene or a selection). This has no affect if there is no current origin node.
Get Origin
This button sets the current selection to the Origin Node. Understand that doing so will deselect the current selection--which can affect your export if exporting a Selection.
Hilight Origin
This button will force the Origin Node to flash briefly in the viewport. Note that if the Origin Node isn't within the current viewport display region, you won't see the node flash.
Export Non-Renderable Mesh as Bone
This checkbox will tell the exporter to exclude the creation of face/vertex data for all objects in the export that are non-renderable. This is useful when using objects as bones that are not properly denoted as bones inside Max internally (like when using CAT bones in some versions of Max). Understanding this setting can help you avoid situations where your exported model has no faces.
Range
The range spinners determine the state of the exported meshes (for Refence Mesh) and bones (for all types of exports).
Start
This spinner controls the frame to use when exporting a Reference SMD (unless you have checked the Ref from Current Time checkbox). It also sets the start frame to use for Sequence and VTA exports.
End
This spinner has no effect when exporting a Reference SMD. When exporting a Sequence SMD or VTA, it sets the end frame.
Ref From Current Time
This checkbox will tell the exporter to use the current frame in the timeline when exporting a Reference SMD. It will override the Start frame setting.
Export (selection)
This option determines what gets exported. The options are Auto, Scene and Selection. How they work are explained below.
- Auto - When selected, the exporter will export objects in this manner: if there are objects currently selected, it will export the selected objects; if no objects are currently selected, it will export all objects in the scene.
- Scene - When selected, export the entire scene regardless of selections.
- Selection - When selected, export only selected objects.
Node Lists (Mesh/Bones)
The UI for WW 2.4+ has an interface to control what nodes will export as both meshes and bones and what nodes export only as bones. The lists are prefilled when the UI is opened based on the Auto rules.
Export List Rules
- Auto: When auto is on, then the Scene Rule is used if no objects are currently selected and the Selection Rule when objects are selected.
- Scene: All geometry nodes will be used as both a mesh and a node except certain nodes hardcoded to be ignored (such as Wall Worm Displacements, etc). Bones, Helpers and shapes will export as bones.
- Selection: This is the same as Scene except it will limit to the currently selected objects. Any nodes that have a skin modifier will cause the bones in the skin to go to the bone node list.
- Manual: The lists are manual.
When in manual mode, you can add and remove items from a list with the buttons around the listboxes.
Export Engine
By default, the only available engine is Wall Worm. But if you own Wall Worm Pro, you can use that engine which is much faster when exporting models with Skin modifiers or when using Explicit Normals.
Export (button)
Run the export and save to file.
Miscellaneous Options
UVW Channel
This spinner controls what UVW channel to use when exporting UVW information. The default value is determined by the global setting for UVW in WW (which itself defaults to 1).
Only Visible Objects
Only include visible objects in the auto-detection and scene settings.
Goldsrc Format SMD
Check this option if exporting a SMD file and it is for the Goldsrc engine.
Latest Articles
Wrinklemaps
Instructions on making wrinklemaps in 3ds Max with Wall Worm Pro.


