Hull Helper
Hull Helper Overview
Hull Helper is a simple UI to speed up making hulls from complex models. It will create a convex hull for each element of each object in a selection. There are also several functions that can be bound to keyboard shortcuts, buttons or quad menus.
Using Hull Helper
- Select the mesh/meshes you want to turn into a hull.
- Click the Prepare From Selection button. At this point, the tool makes a copy of your selection and hides the original objects, then combines your selection into a single Editable Poly; that poly is called Hull 00#; the new object is selected and put into Polygon sub-object mode.
- Select contiguous faces that represent areas of the model that should be converted into a single convex part of your hull. For example, if your mesh is of a human, you could select each face of the head.
- Click the Detach button in the UI. This detach is similar to the Detach in an Editable Poly (in fact it calls that function). But it does this specifically: the selected faces are detached into an Element sub-object and immediately hidden.
- Continue the process of detaching each element until all pieces are done. Returning to the example of the human, you would make a hull for the chest, one for the torso, on for each upper leg, lower leg, etc.
- When finished, unhide all the faces of your model.
- No click the Create Hulls From Selection button. The tool will create a hull for each element sub-object of each object in the selection.
- In WWMT, click the Add CM Sel button to assign the hulls to your model.
- If you have broken your mesh into Elements that are not correct, you can unhide the faces and merge elements by going into Vertex sub-object mode, selected the boundary vertices of those elements and clicking Weld in the modifier panel.
Hull Helper Toolbars
In 3ds Max 2017+, there is a toolbar for the Hull Helper functions. You can get this by clicking an empty spot in the Max menu bars and choosing "Wall Worm Hull Tools".

Hull Helper MacroScripts
There are several macroscripts in Wall Worm that expose several functions of Hull Helper to buttons, keyboard shortcuts or quad menus.
- Create Hull of Each Element - Make One Hull for each element of each object in selection.
- Create Hull of Each Selected Element - Create one hull of each element of each object in selection where the elements used have at least one face selected.
- Create Hull of Selected Elements - Create a single hull around all elements of each object selected where the elements used have at least one face selected.
- Create Hull of Selected Faces - Create a single hull using the current face selection.
- Detach Faces and Hide - Detach the currently selected faces to their own Element and immediately hide them.
- Wrap One Hull on Selection - Make a single hull wrapping all of the currently selected objects.
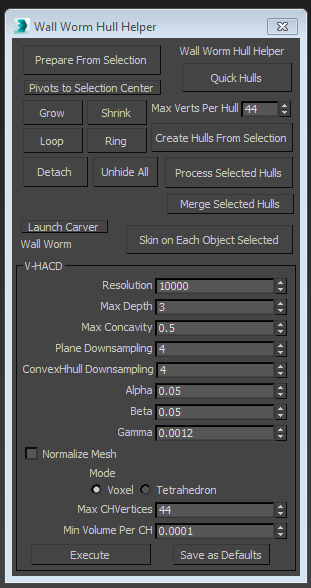
V-HACD
The latest version of Wall Worm now includes V-HACD. The V-HACD functions will generate a collection of convex hulls from a concave object. This function is best for organic static props. You may find problems with using it to create hulls for animated props.
Using V-HACD
- Select the object(s) you want to generate hulls for.
- Open Hull Helper.
- In the V-HACD group, set the desired values.
- Click the Execute button.
- Now the V-HACD process will run in a CMD window. When finished, there will be a Max prompt for the WRL importer.
- Uncheck the Reset Scene checkbox.
- Now the hull will appear in the scene.
Tips:
- Max communicates with V-HACD by exporting a temporary OBJ file. The results may depend on the global OBJ exporter settings. For best results, you may need to change some of the OBJ settings globally (which MAXScript/Wall Worm do not have access to). You may get best results if you set the Faces method to Triangles in the OBJ exporter settings.
- If you only select a single object to generate a hull from, the resulting hulls will be collapsed into a single editable poly, the smoothing groups processes and the hull name will match the object name except have "_hull" appended to the end.
- Making Collision Models
Articles about making collision models.
- Related Topics


