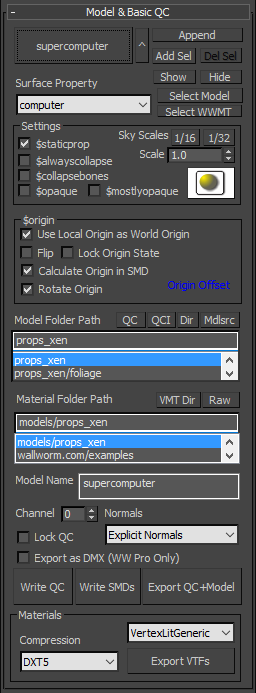
Model & Basic QC Rollout
The Model & Basic QC rollout is where you can control many of the basic settings for your model. WWMT does not include an exhaustive list of all QC command controls. Instead, it provides the most common and basic settings for controlling your model and QC file. Should you need to add options not listed here, you can open the QCI file and add them manually.
You can click on a menu item in the graphic below to jump to information on that button.
Pick Model Mesh(es)
- Pick Model
-
This button us used to either pick a root mesh for your model or to get the model properties that have previously been assigned to a model.
If this is a new model, WWMT will create a text helper labeled "WWMT: " plus the name of the object. That text stores all of the info for your model!
- Selecting an object with this button sets that object's Pivot Point as the working origin for your model and the meshes that you later add (if you also choose Use Local Origin as World Origin in the export options). This is most important if you are not building your model at the scene origin.
- To fill the WWMT with the values of an object that you already applied WWMT to, simply pick the text helper that is prefixed with "WWMT:"
- If you delete the text helper that WWMT creates when you pick a new model, all settings for the model are lost.
- Object Filter Toggle
-
This button toggles the comprehensive filter function. By default WW blocks you from picking objects that are generally not valid for models (like displacements, light objects, many kinds of helpers, etc) to keep you from accidentally assigning to the WWMT helper. However, if the scene has several thousand objects, the selection filter can be slow so you can turn to the simple filter.
- Append
-
When active, you can pick this button then select an object in your scene to add to your model. Note the button allows you to ADD one model upon clicking. If you need to add multiple meshes, see the Add Selection Button
- This button is inactive until you have selected a model with the Pick Model Button.
- Add Selection
-
Pressing this button will add all selected items to your model.
- This button is inactive until you have selected a model with the Pick Model Button.
- Delete Selection from Model
-
Pressing this button will remove selected meshes from the model.
- This button is inactive until you have selected a model with the Pick Model Button.
- Show Model
-
This button unhides all the nodes assigned to the WWMT helper.
- Hide Model
-
This button hides all the nodes assigned to the WWMT helper.
- Select Model
-
This button will select the model in the Max viewport. If there are multiple meshes in your model, all will be selected.
- Select WWMT
-
This button will select the WWMT Helper in the Max viewport.
QC Settings
- Surface Property | $surfaceprop
-
Use this menu to set the $surfaceprop command for your model. The list here is from Valve's stock props.
The $surfaceprop controls things like the sound emmited from the property during collisions as well as various effects in game.
- When you choose $automass, then the $surfaceprop will be used to calculate the mass of the model.
- According to the VDC, using $surfaceprop in the QC will override the $surfaceprop of a material applied to the model.
- See the VDC entry for $surfaceprop
- Static Prop | $staticprop
-
Setting the $staticprop option will tell the compiler that this model has no animations. All bones will be removed. Note that if you have a Collision Hull, then setting $staticprop will make the QC file use the $collisionmodel QC command; if $staticprop is not set, the QC file will use $collisionjoints instead.
- This setting will stop the exporter from making any Sequence SMDs for this model even if you have added Sequences in the Sequences Rollout.
- See the VDC entry for $staticprop
- $alwayscollapse
-
This setting will add an $alwayscollapse for each mesh node in the model. Use this when you do not want the meshes to include a bone entry in your final model.
- $collapsebones
-
Collapse all bones not in hierarchy and with no weighted vertices. Such bones will be removed from the exported model.
- Opaque | $opaque
-
Setting the $opaque option make this model assumed to be opaque in-game. This is a performance setting.
- If you also have Force Opaque VMT if Model $opaque set in the WWMT settings, then textures you export will not have any transparency in models having the $opaque flag checked.
- See the VDC entry for $opaque
- Mostly Opaque | $mostlyopaque
-
Setting the $mostlyopaque causes the model to be rendered in two passes in-game. It is a performance setting for some kinds of models like trees that have multiple parts--some of which are opaque and others of which are not opaque.
- See the VDC entry for $mostlyopaque
- Scale | $scale
-
This setting will scale the model by the given float value at compile time (not in the 3ds Max viewport).
- Press the 1/16 button to set the scale to 0.0625.
- Press the 1/32 button to set the scale to 0.03125.
- If you want to make a copy of a model for the 3D Skybox that you designed for real-world scale, set the scale to 1/16* (which equates to 0.063 in the Scale Spinner).
- *According to VDC, the scale for L4D is 1/32 (which is 0.031 in the scale spinner).
- See the VDC entry for $scale
- Illumination Position Helper | $illumposition
-
Copy of same Illumination Position Helper in Lighting Rollout. Here for expediency.
Origin | $origin
- Use Local Origin as World Origin
-
Use this option to offset the origin of your compiled model in relation to the model's distance from the current Max Scene's world origin. This is necessary if you design in a scene and the model is not located in the world's origin.
- Use this option if you are designing models inside scenes and do not want to move the model to [0,0,0] before exporting.
- When using the Wunderboy SMD Exporter or the Cannonfodder exporter, this setting will add a line in your QC called $origin. If using the WWMT SMD Exporter, the offset is calculated in the SMD itself if you turn on Calculate Origin in SMD.
- If you want to exclude animations of the root node (and it is the only unparented node in your model) then you can use the Lock Origin State option.
- Flip
-
This setting essentially exports the model as a mirror of itself.
- Lock Origin State
-
This option only works if Use Local Origin as World Origin is turned on. When on, the root node animation is always ignored. When off, the root node animation is included in the SMD. Only works with the WW SMD Exporter. Note that this function is opposite of what it used to be defined as doing in older documentation.
- Calculate Origin in SMD
-
This setting is only available when using the WW SMD Exporter. When on, it will exclude the $origin command in the QC and instead write offset the SMD nodes. This setting is preferred when using the WW SMD Exporter because some mods like CS:GO will not correctly use the $origin command in the QC in all situations (or at least did not when this setting was added).
- Rotate Origin
-
This will force the model to rotate at 90 degrees. This setting should only be used with $staticprop models. Its effect is that a static prop will be oriented with no rotations in Hammer as it is in Max without rotations.
- You should not use this setting with models not using $staticprop. In other words, do not use it on animated props, rigged props, etc. It generally creates problems if not using $staticprop.
Export Paths and Options
For reference, you may want to read Path Setup tips if you are having problem exporting models or textures.
- Model Folder Path
-
Enter the relative path for this model starting with the folder name that is inside your mod's model folder. Always enter a relative path (excluding everything up to and including the "models" folder). So you should enter values like "props/household" or "props_foliage/small_plants".
- Do not use absolute paths.
- You should use forward slashes.
- The exported SMDs and QCs will go into your Source SDK paths that mirror the mod directories. As an example, they would go to the modelsrc/props_foliage/small_plants folder.
- The compiled model (MDL) will output into the model folder. As an example, they would go to the models/props_foliage/small_plants folder.
- QC (Open QC File)
-
Open the QC file for this model in a text editor. Only works if the QC exists (meaning you've exported the model at least once).
- QCI (Open QCI File)
-
Open the QCI (QC Include) file for this model in a text editor. Only works if the QCI exists (meaning you've exported the model at least once).
- WW only creates the QCI file when exporting a model and the QCI file does not exist already. This means it is never overwritten.
- The QCI file is included at the end of every QC file when exporting a model.
- Use the QCI file to inject custom commands that are not controlled with other WWMT helpers and settings.
- Dir | Open MDL Folder
-
Open the folder where the final MDL file compiles to.
- Open Folder (Model)
-
This button will open up the folder where your SMDs and QC and Batch file to compile them will be written to.
- If the Model Folder Path is empty, this will open the Default Model Path defined in the WWMT settings.
- If the folder does not yet exist, it will open in a location such as My Documents.
- Material Folder Path
-
Enter the relative path for this model's materials starting with the folder name that is inside your mod's material folder. For example, enter something like "models/props_foliage/small_plants" or "models/cars".
- Do not use absolute paths.
- You should use forward slashes.
- To get your textures to appear in-game, you must convert them to VTFs and VMTs. The tool now has a VTF Texture Exporter in the Utilities Rollout.
- Open Folder (Material)
-
This button will open up the folder where your raw textures (TGAs) will be copied to along with the Batch files to compile them.
- If the Material Folder Path is empty, this will open the Default Material Path defined in the WWMT settings.
- If the folder does not yet exist, it will open in a location such as My Documents.
- Model Name | $modelname
-
Enter the name of this model (with no file extensions). If you enter "MyModelX", then the $body SMD will be MyModelX.smd and the final compiled model will be MyModelX.mdl.
- Do not use spaces!
- Do not use special characters!
- Use only letters, numbers and underscore.
- WWMT does not do any error checking for the name of the file!
- Channel
-
This tells the SMD exporter what mapping channel to use at export time. This is useful if you have multiple map channels on your model but the one used for Source isn't in channel 1. Setting this to a value of 0 will force the SMD exporter to auto-detect the UV channel per face based on the texture using it. Setting the value to 0 does have a performance hit but also means you can use multiple UV channels when setting up your model.
- This option only works when using the Wall Worm SMD Exporter (or Wunderboy's SMD Exporter 1.17+).
- The automatic detection channel of 0 only works in the WW SMD Exporter and WW Pro.
- Lock QC
-
Turn this setting on if you do not wish for WWMT to modify the QC file any more when exporting. You might do this if you have custom edits to the QC and don't want WW to overwrite them.
- Although this setting is useful, it should generally be left off. When turning it on, no changes to your WWMT helper will translate to the compiled model when re-exporting.
- As an option to the Lock, you can consider doing custom edits in the QCI File that WW creates but never overwrites when exporting and that is always included in the main QC.
- See also the Global Overwrite QC Setting.
- Export as DMX
-
Export the model data in the DMX format instead of SMD/VTA formats. Required when exporting wrinklemaps. Only available if WW Pro is installed.
- FBX
-
Export the model data in the FBX format. Only some games (like CSGO) will allow this.
- Normals
-
This option tells the SMD exporter what method to use when calculating vertex normals. By default, the exporter uses the Face Render Normals which are calculated by the Smoothing Groups of the Faces. However, you can give fine-tune control by using the Explicit Normals option. See this article on smoothing groups and explicit normals.
- This option only works when using the Wall Worm SMD Exporter.
- When using models imported from Maya (or other apps that don't use smoothing groups) you should always use the Explicit Normals option.
- The Face Render Normals option may export more quickly than the Explicit Normals option.
- If you have WW Pro installed, you may want to always set this to Explicit Normals since it will export just as quickly as using face render normals and will account for face normals and explicit normals.
- You can change the default normal method for newly created WWMT Helpers in the global settings.
- Export Model
-
Click this button when you are ready to run the exporter. Below is what happens:
- WWMT makes a QC file based on the settings in WWMT.
- WWMT exports all SMDs into your Export Path (which is controlled by the WWMT Export Option: Model Root and this model's Model Folder Path).
- If you have entered the Bin Directory, WWMT writes a Batch file into the same director as your QC file that will run the compiler for your QC.
- If Compile Models on Export is turned on and you have entered the Bin Directory, WWMT will run the compiler batch file. If Steam is running and the destination folder (compiled model target folder) exists, you should now be able to load your model in the model viewer.
- Export VTFs
- WWMT Rollouts
Rollouts on Wall Worm Model Tools.
- Related Topics


